GPT Image 2.5 Prompts for 8 Practical Image Tasks
A useful image prompt describes what you want to change, what must stay the same, and what a usable result looks like. Start with one of the eight GPT Image 2.5 prompts below, upload a reference image where needed, and check the output against the requirements for that task.
These examples start with sketch-to-scene and sketch-to-interior workflows, then cover product backgrounds, posters with exact text, video thumbnails, outfit changes, character consistency, and small local edits. Each includes a complete prompt, the actual output, a review checklist, and a follow-up prompt for a specific problem.
Choose a task:
- How to use these prompts
- Turn a rough sketch into a scene
- Turn a room sketch into an interior rendering
- Product photo background edits
- Social media posters with exact text
- Video thumbnails with room for a title
- Portrait edits that change only the outfit
- Character consistency across images
- Local edits and a second attempt
- Frequently asked questions
How to use these prompts
- Choose the task and prepare the input. Use a clear reference image for editing tasks. The poster example can start from text alone.
- Copy the full prompt. Replace any bracketed variables before generating. Keep the instructions about what must remain unchanged.
- Set the available output controls. If the tool offers an aspect-ratio selector, match it to the prompt. Check the selected model in the tool.
- Compare the result with the original. Look at small details as well as the overall composition. A convincing image can still contain the wrong label or a changed face.
- Make one focused follow-up edit. Name the visible problem, keep the original reference available, and inspect the next output again.
For a reusable prompt, this structure is a useful starting point:
text
Use [reference image or subject].
Change [specific element] to [desired appearance].
Preserve [identity, geometry, text, pose, lighting, or other constraints].
Place [subject] in [composition].
Do not add [unwanted elements].
Output [aspect ratio or intended format].
Constraints describe your intent; they are not proof that the output followed it. Keep a record of the model, input, prompt, settings, and attempt count so that a successful result can be checked and repeated.
Turn a rough sketch into a scene
Use case: Decide where a person and a car belong before describing the final style. A few marks can communicate left/right placement and empty space more directly than a long spatial description.
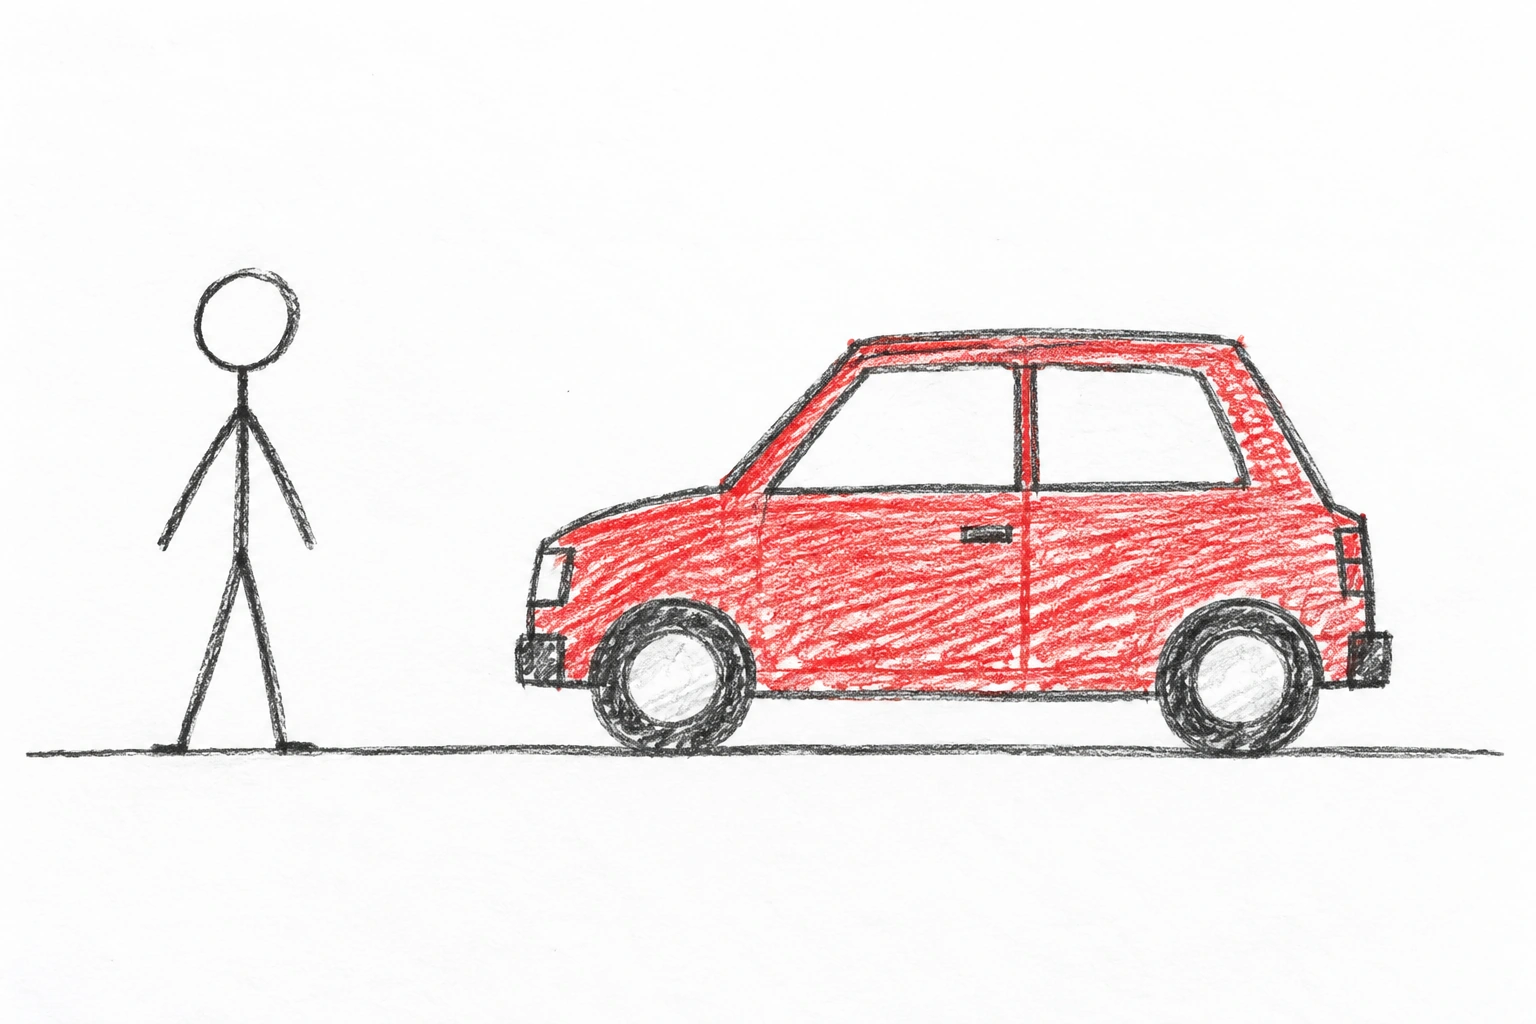
This source sketch was AI-generated for the tutorial. You can draw your own equivalent on paper or in a drawing app and upload it as a reference. These are original generated examples inspired by the sketch scenarios described in the supplied article, not screenshots of its images or the ChatGPT Sketch interface.
Full prompt
text
Use the supplied sketch as a composition reference. Turn it into a natural editorial photograph, landscape 3:2. Keep one full-length adult on the left and one small red hatchback in side profile on the right, facing left. Preserve the gap between them, the ground line, and the generous space above. Place them on a quiet paved turnout with a distant low grassy horizon in soft overcast daylight. The person wears a plain beige jacket and dark trousers. Keep the car completely visible. No other people, vehicles, logos, lettering, or watermarks.Actual result
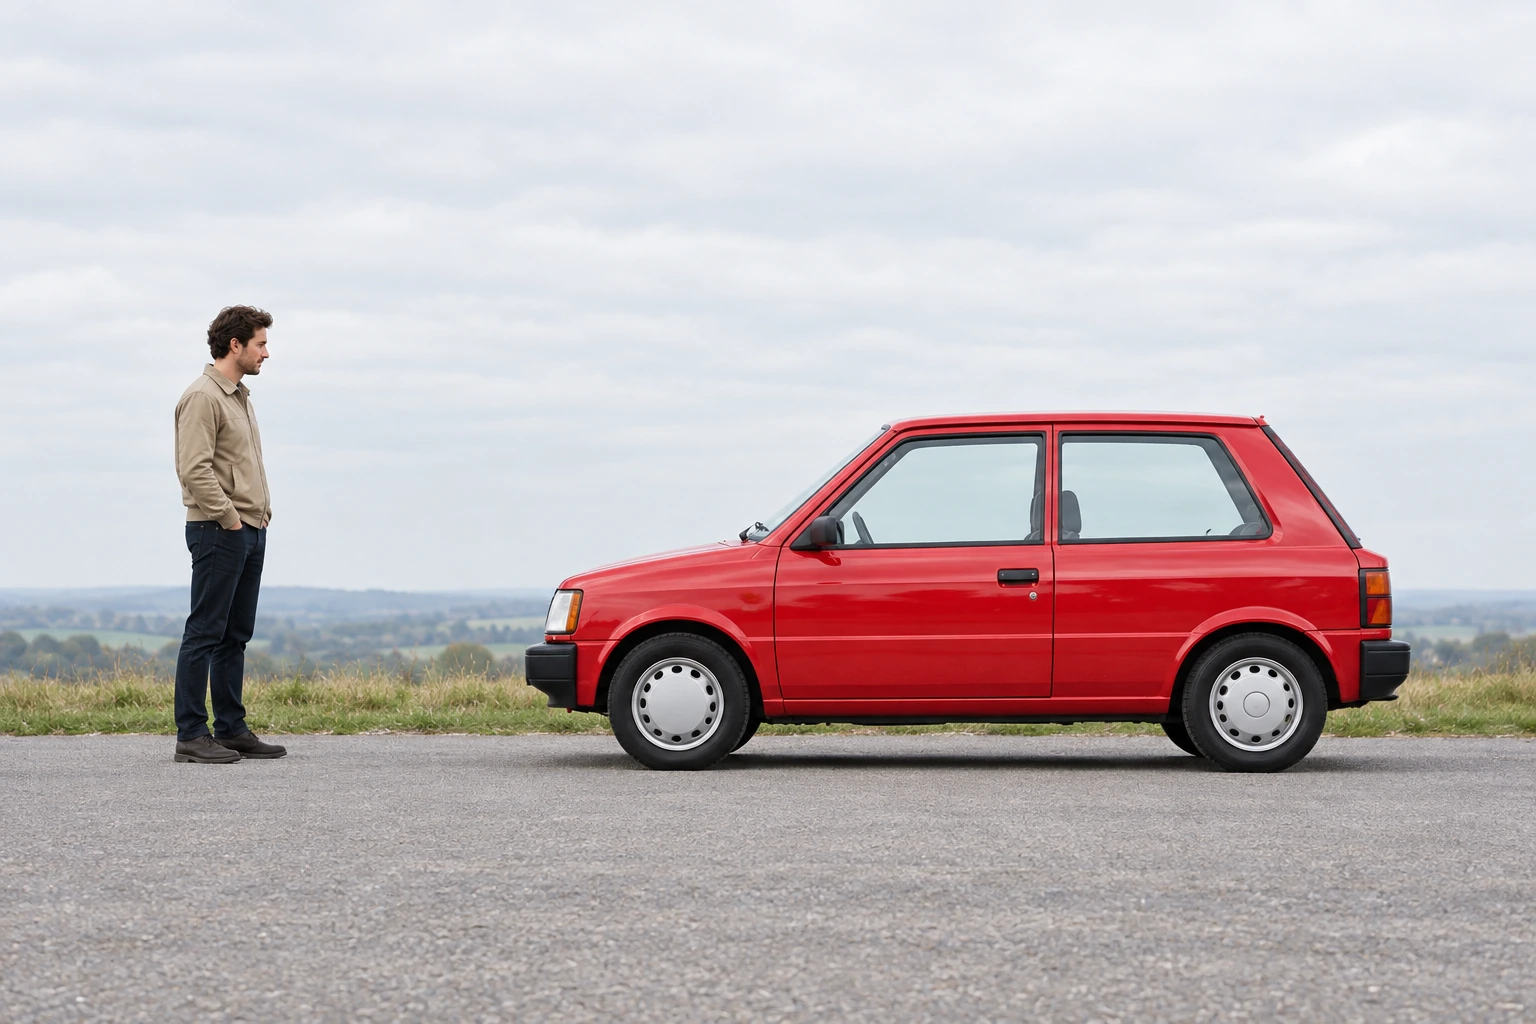
The output keeps the person on the left, the red car on the right, and open space above them. The car is fully visible and faces left. This is one sketch-to-image attempt, not a repeated-trial success rate.
Limitations to check
The person becomes a side-facing adult with hands in pockets rather than matching the stick figure's arm positions. The car silhouette is more realistic and differs from the rough outline. The sketch guides broad placement; it does not fix identity, exact pose, or vehicle geometry. Draw those details more clearly when they matter.
Follow-up prompt
text
Use the original sketch and the generated scene as references. Change only
the person's pose: face the camera with both arms relaxed at the sides.
Keep the person on the left, the red car on the right, their separation,
the camera position, and the overcast lighting. Do not add objects.
This proposed follow-up has not been run. Check whether it corrects the pose without moving the car or changing the scene.
Turn a room sketch into an interior rendering
Use case: Explore materials and lighting while keeping a simple furniture layout readable. Start with the window, sofa, table, and plant rather than trying to describe every coordinate.
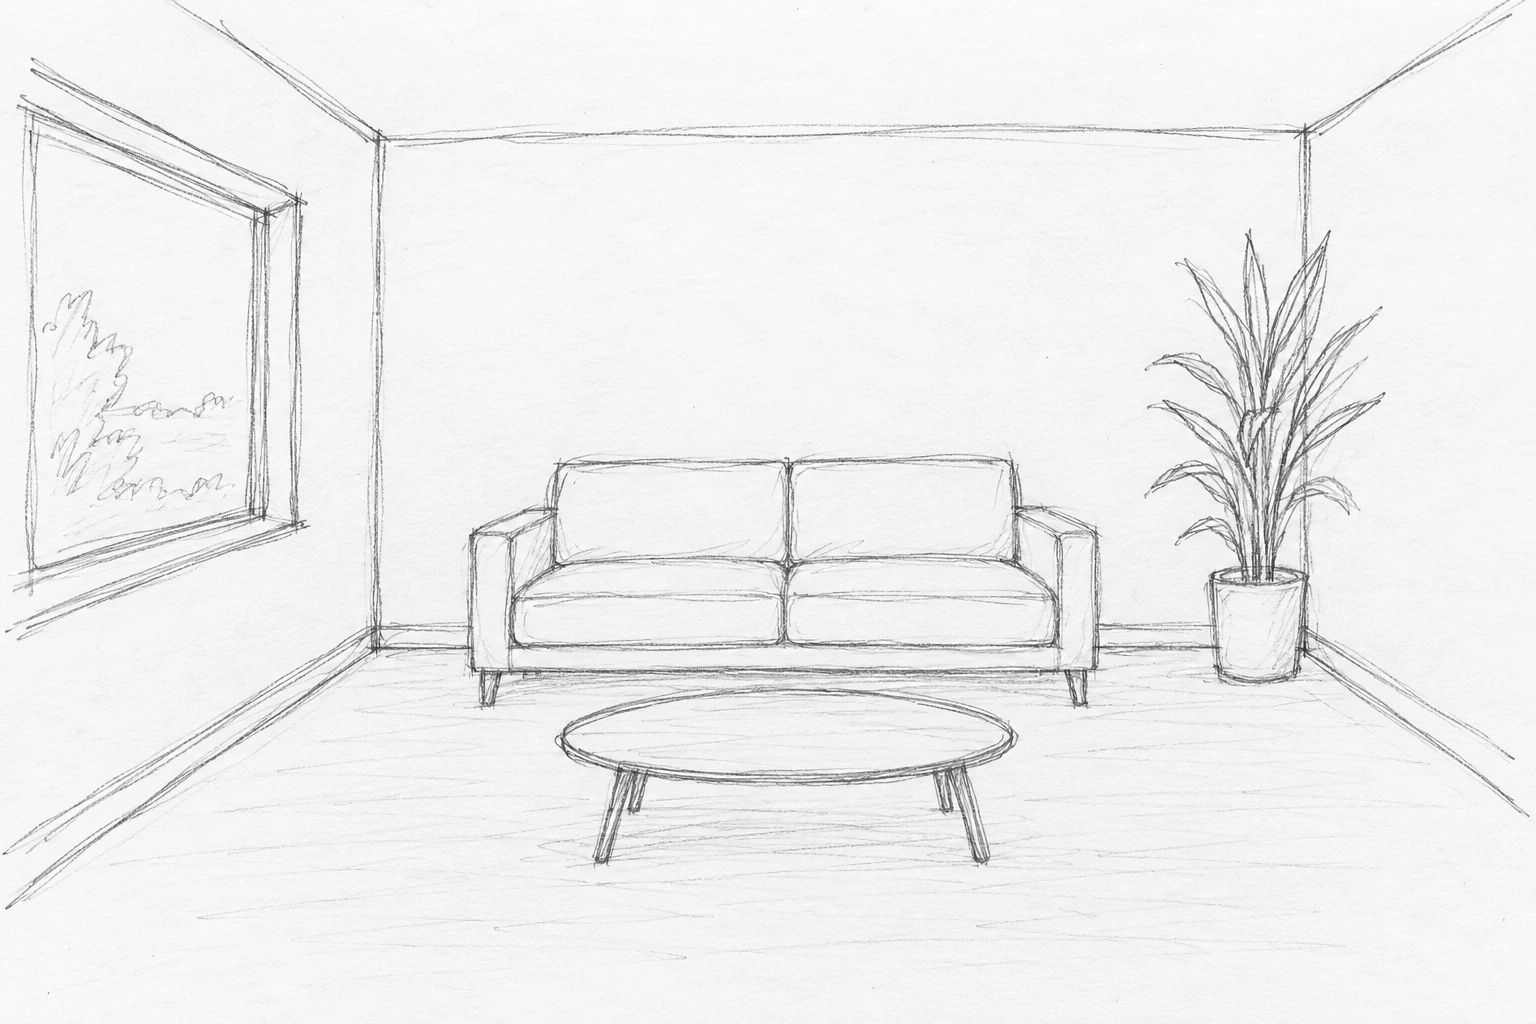
This AI-generated source drawing is a perspective sketch, not a measured floor plan. Use a dimensioned plan and appropriate design tools when exact room measurements matter.
Full prompt
text
Use the supplied room sketch as the composition reference. Create a photorealistic interior visualization, landscape 3:2. Keep the same eye-level camera, rectangular room, large left-wall window, two-seat sofa centered on the back wall, oval coffee table in front, and tall potted plant in the back-right corner. Use warm white plaster walls, light oak flooring, a beige linen sofa, and a natural oak table. Soft daylight enters from the left. Keep the floor uncluttered. Do not add a rug, wall art, lamps, people, text, or extra furniture. Preserve the placement and relative scale of the main objects.Actual result
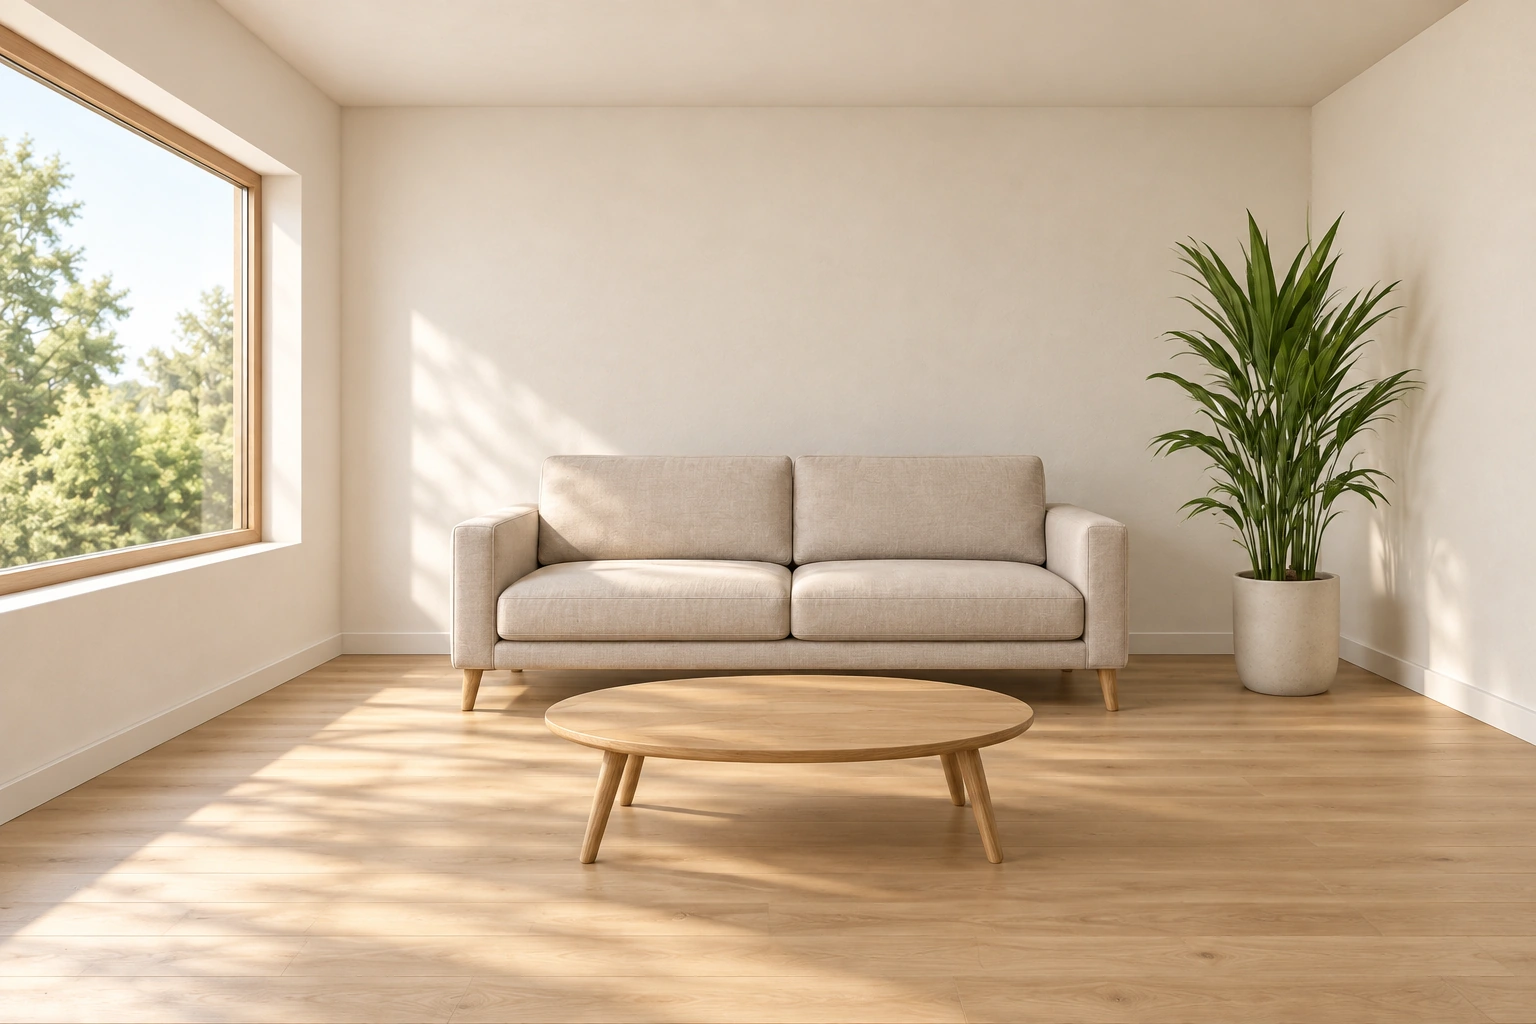
The window stays on the left, the sofa remains against the back wall, and the oval table sits in front. The plant stays on the right. The requested beige upholstery and oak surfaces appear, with no added rug, wall art, or lamps. This result comes from one attempt using the displayed sketch.
Limitations to check
The render introduces stronger sunlit patches and shadows than the requested soft daylight suggests. Window proportions and furniture details also differ from the drawing. It is useful for a visual direction, not proof of exact dimensions or construction feasibility.
Follow-up prompt
text
Change only the lighting to soft overcast daylight from the existing left
window. Remove the bright sun patches and hard-edged floor shadows.
Keep the camera, window, sofa, oval table, plant, materials, and furniture
positions unchanged. Add no objects.
This proposed lighting correction has not been run. Compare both the shadows and furniture positions after trying it.
Product photo background edits
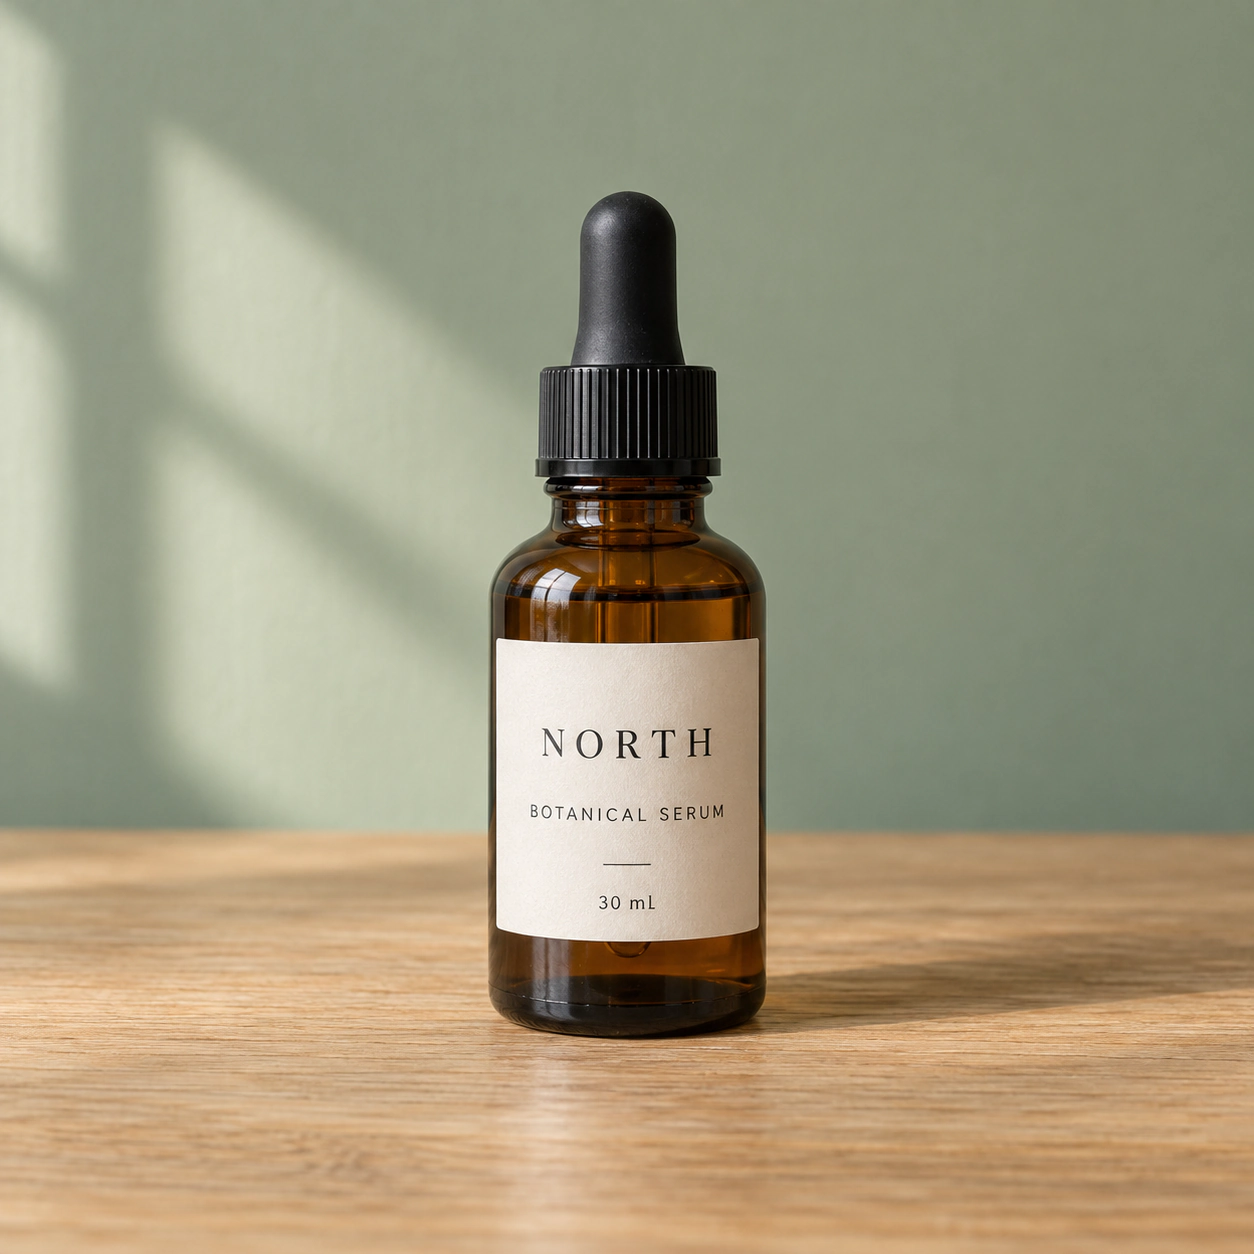
Use case: Replace a product photo's background while keeping its packaging and label recognizable and accurate.
Prepare a sharp image with the entire package visible. Small label text should be readable in the input; otherwise, you will have little evidence for checking it in the output.
Full prompt
text
Use the uploaded product photo as the source. Replace only the background
with a warm off-white studio backdrop and a soft natural contact shadow.
Preserve the exact package shape, proportions, colors, logo, label text,
and camera angle. Keep the entire product visible and centered.
Do not redraw or add text. Output a square product image.
Actual result
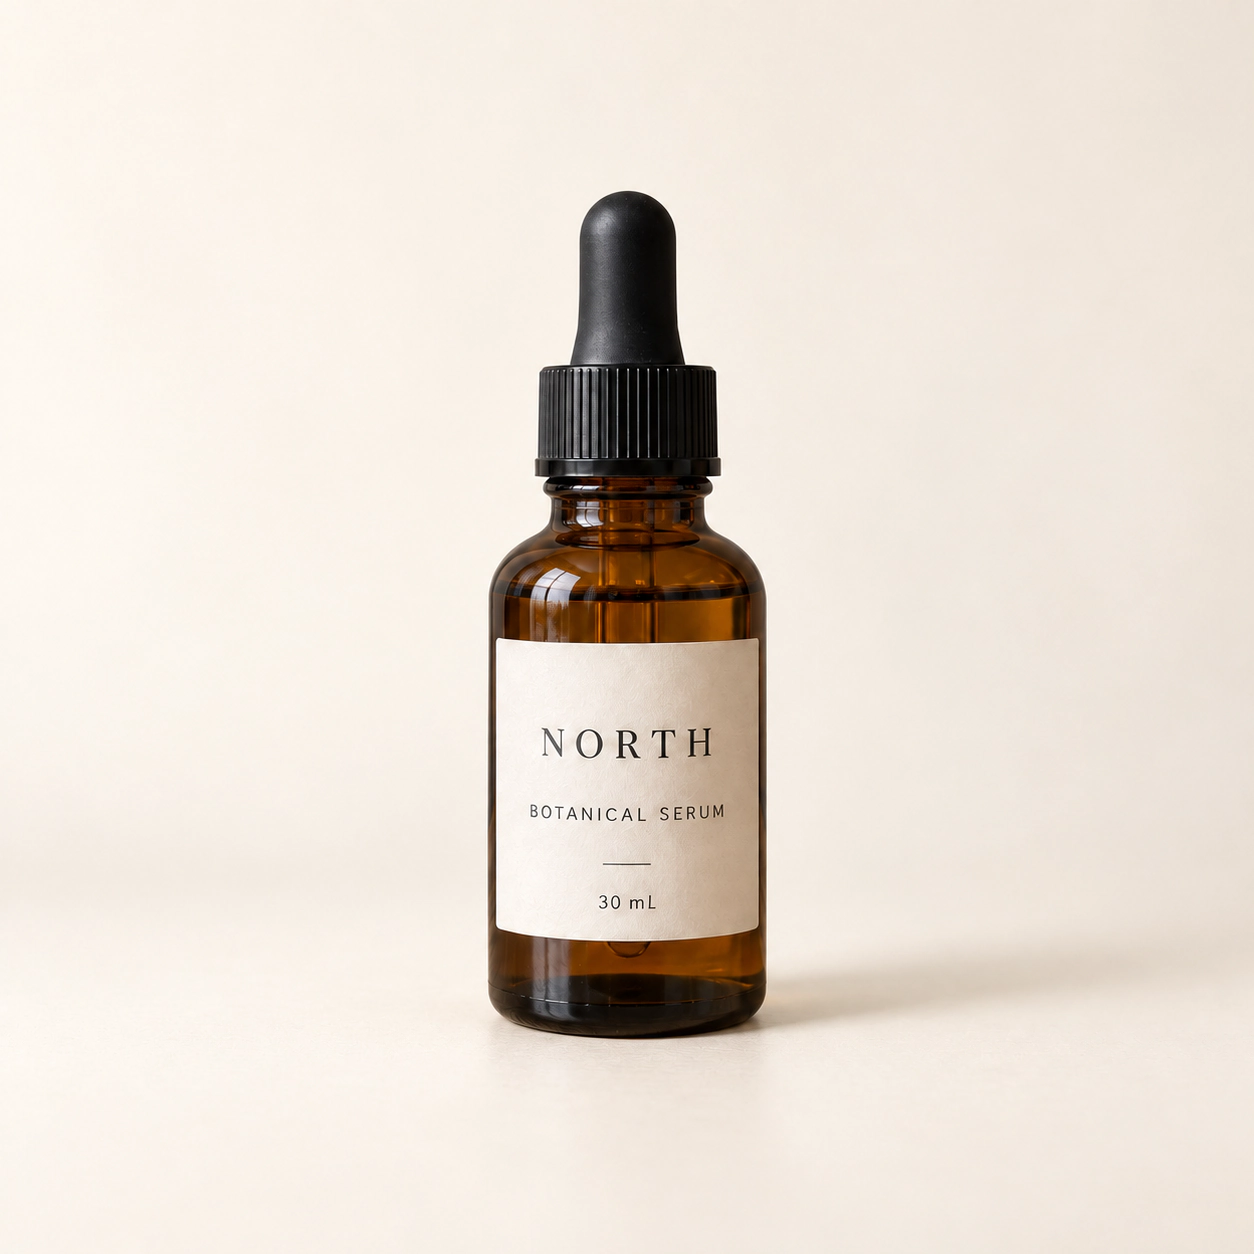
The green wall and wooden tabletop were replaced with an off-white studio setting. The bottle stays centered and fully visible. The three label lines read “NORTH,” “BOTANICAL SERUM,” and “30 mL” in both the source and the first output.
Check the package outline, cap or closure, logo placement, and label text. Compare fine print at full resolution. A clean background alone does not make this a successful product edit.
Limitations to check
The first edit meets the broad background brief, but reflections in the amber glass and the label surface look different. Preserved wording is not the same as an unchanged product image. This is a visual comparison, not a pixel-preservation claim.
If the background works but the package has changed, try restoring the product from the original reference.
Follow-up prompt and observed outcome
text
Edit the previous result using the original product photo as reference.
Restore the product and every label detail from the source. Change only
pixels outside the product silhouette. Keep the off-white background
and soft contact shadow. Do not alter the package.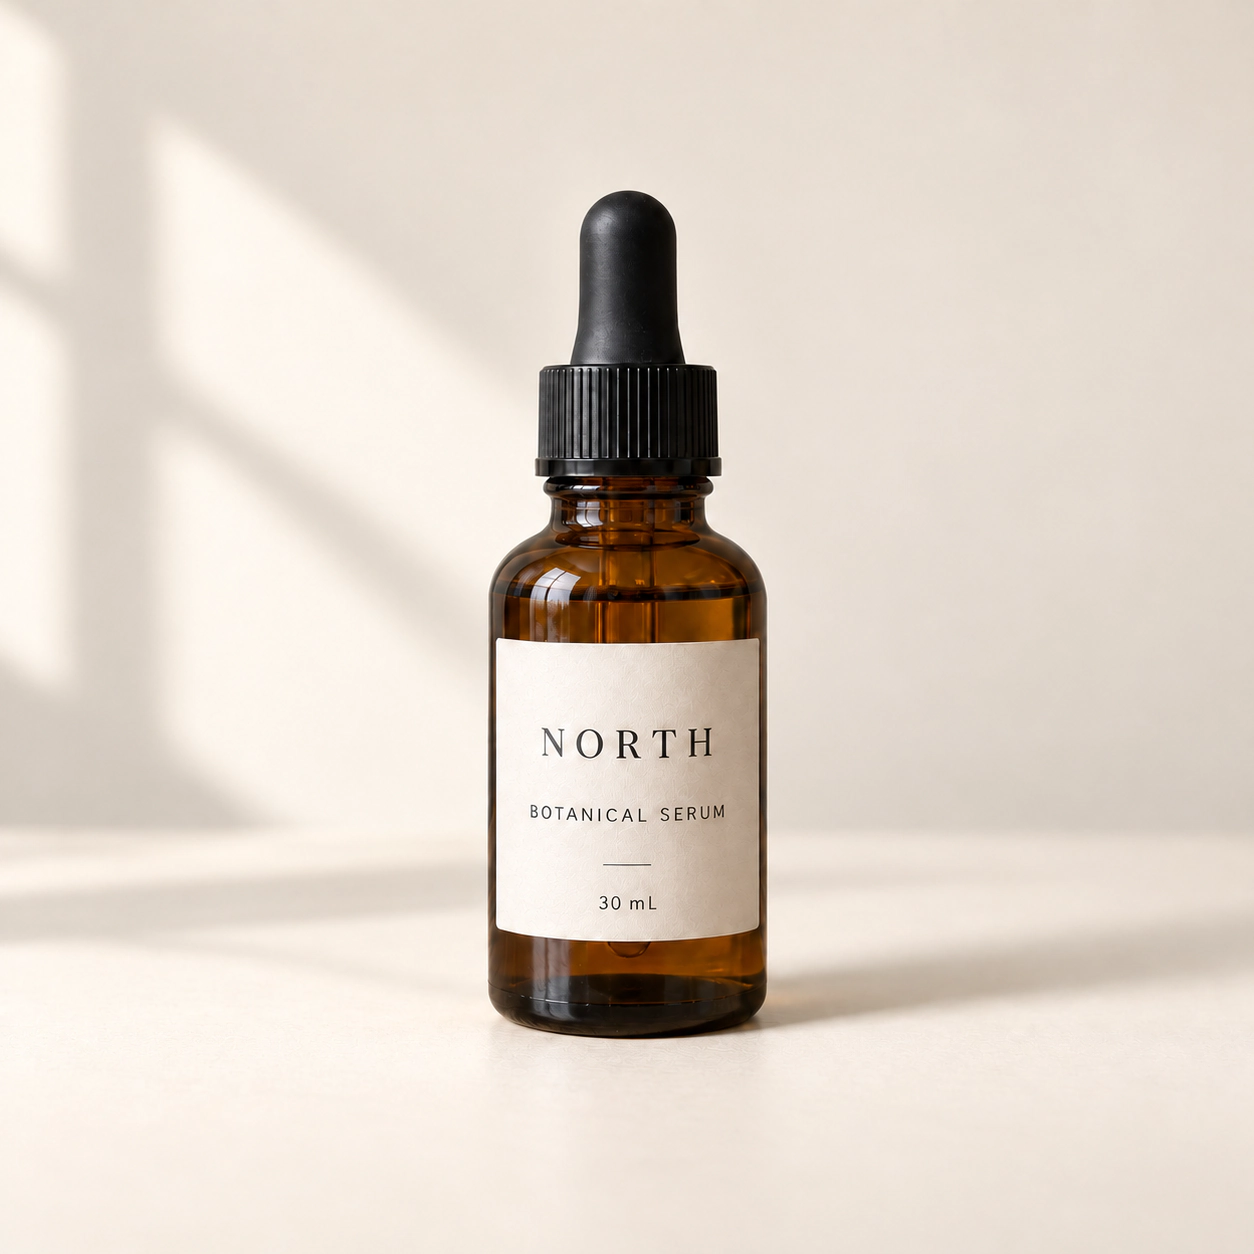
The second output keeps the three readable label lines, but adds pronounced window-like shadows to the backdrop. That makes the setting busier than the first output. For a clean studio background, we would keep the first version; the follow-up is shown as a regression, not a guaranteed improvement.
Social media posters with exact text
Use case: Create a square coffee-event poster with three specified lines of text.
This example separates the text you want from the visual instructions. Quotation marks make the requested wording easy to identify and compare afterward.
Full prompt
text
Create a square social media poster for a fictional weekend coffee event.
Use a cream background, a simple illustrated coffee cup, and dark brown
typography. Include exactly these three text lines:
"WEEKEND COFFEE"
"BUY 1 GET 1 FREE"
"SATURDAY 10 AM"
Make the first line the largest. Keep all text fully visible with generous
margins. Add no other words, logos, or watermarks.
Actual result
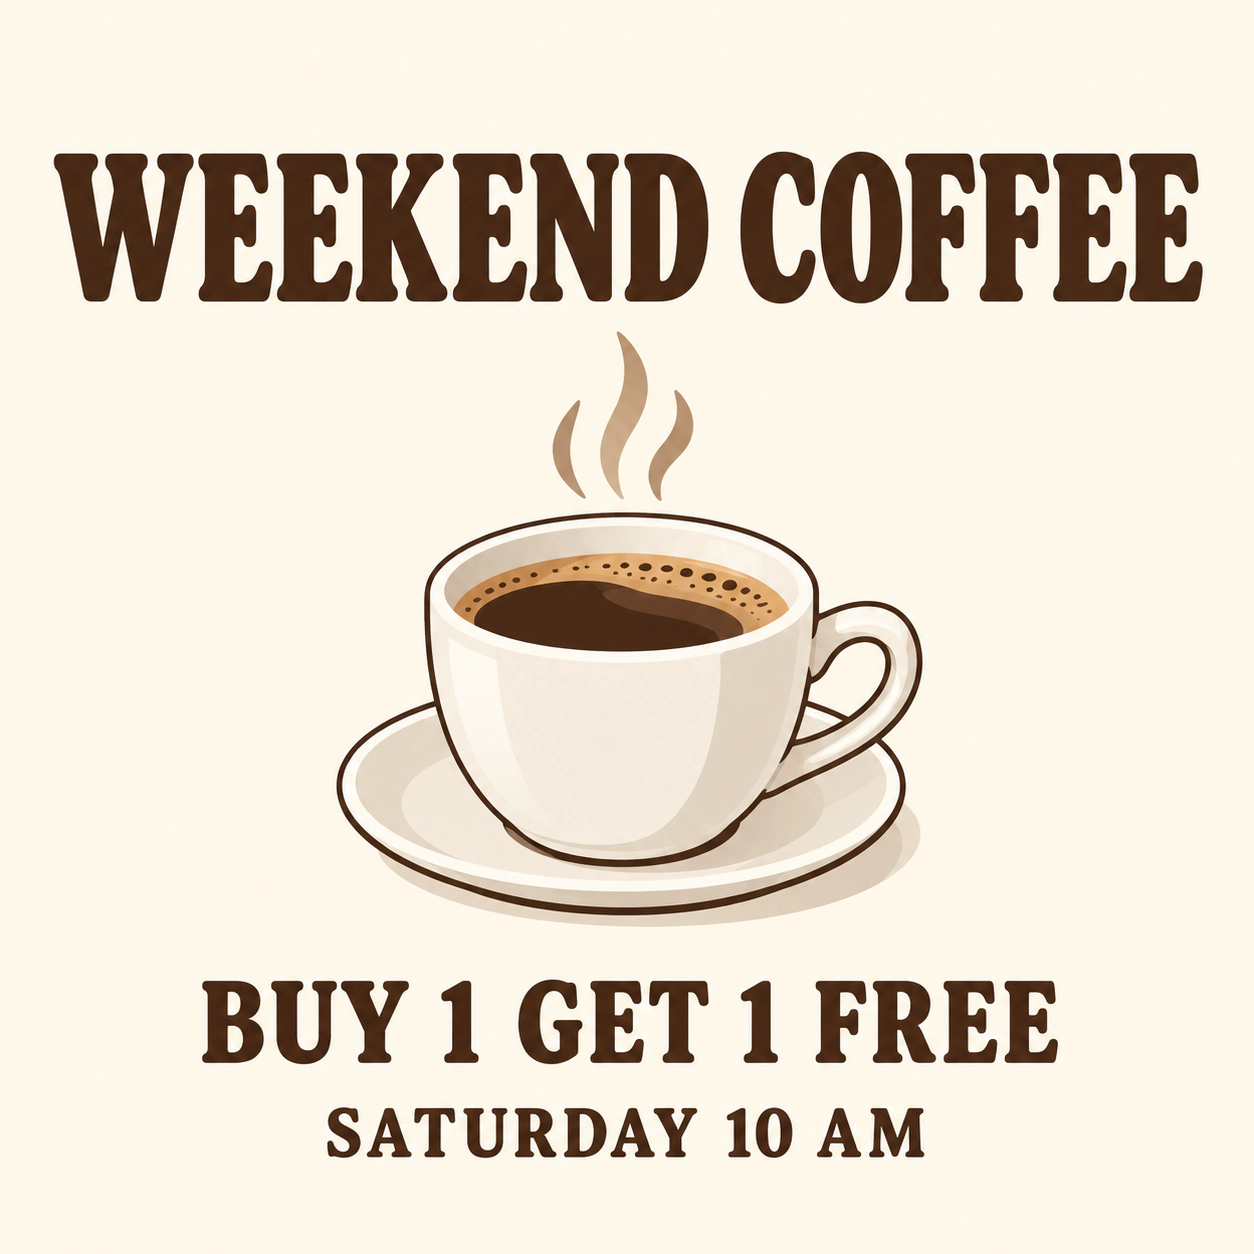
The first poster displays all three requested lines: “WEEKEND COFFEE,” “BUY 1 GET 1 FREE,” and “SATURDAY 10 AM.” A large coffee-cup illustration separates the headline from the offer. No additional wording is visible.
Check every character, including the two instances of “1.” Also look for duplicated words, decorative text, and letters cut off at the edges. Inspect the poster at its intended social-feed size as well as full resolution.
Limitations to check
We did not find a spelling error in this output. The decorative serif headline sits close to the left and right edges. The next attempt tests a typography change; it is not evidence of fixing a nonexistent text failure.
If the lettering is inaccurate or crowded, simplify the typography before adding more visual detail.
Follow-up prompt and observed outcome
text
Revise the poster. Replace all text with exactly three lines:
"WEEKEND COFFEE"
"BUY 1 GET 1 FREE"
"SATURDAY 10 AM"
Use plain bold sans-serif lettering and increase the space around each
line. Keep the coffee illustration and cream background. Add no other text.
The revised poster uses bold sans-serif lettering and retains the requested wording. However, the bottom line sits closer to the lower edge, and the gap between “SATURDAY” and “10” looks tight. The font change worked; the request for more breathing room did not clearly improve the layout.
Video thumbnails with room for a title
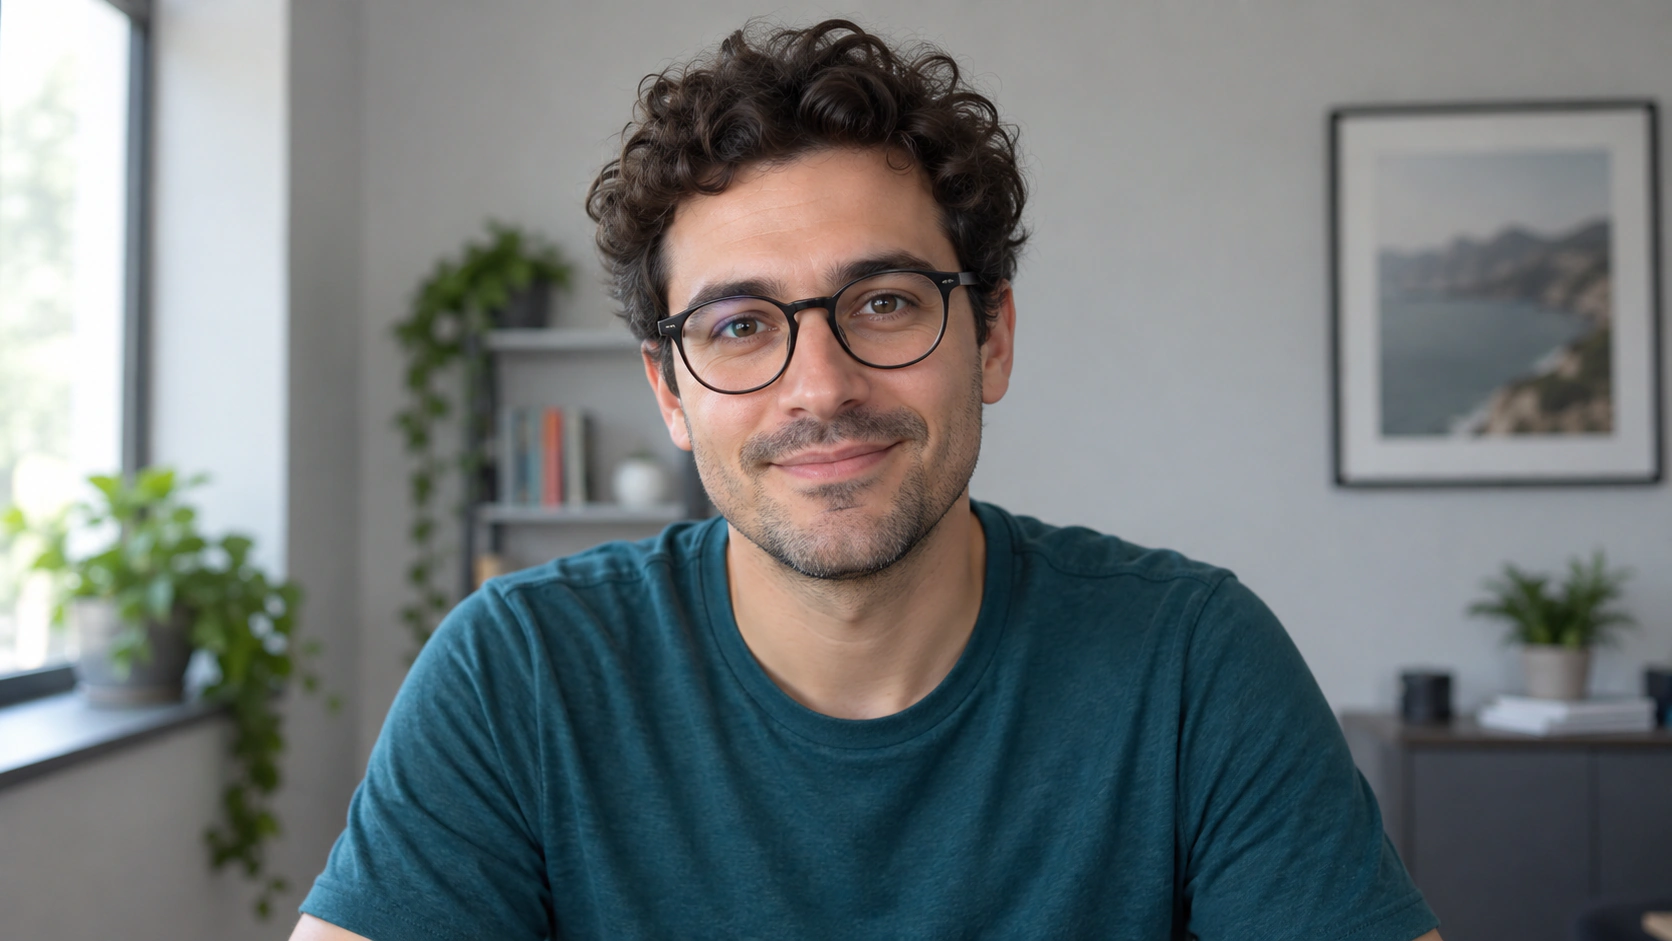
Use case: Place a recognizable subject on the right and leave the left side available for a title added afterward.
Here, the empty area is part of the deliverable. Judge the composition by whether your title can fit without covering the subject.
Full prompt
text
Use the uploaded subject photo to create a 16:9 video thumbnail. Place the
subject on the right half, with the face clearly visible and strong
separation from a dark blue background. Keep the left 40 percent
uncluttered and low-detail for a title added later. Preserve the subject
identity. Add no text, letters, logos, or extra people.
Actual result
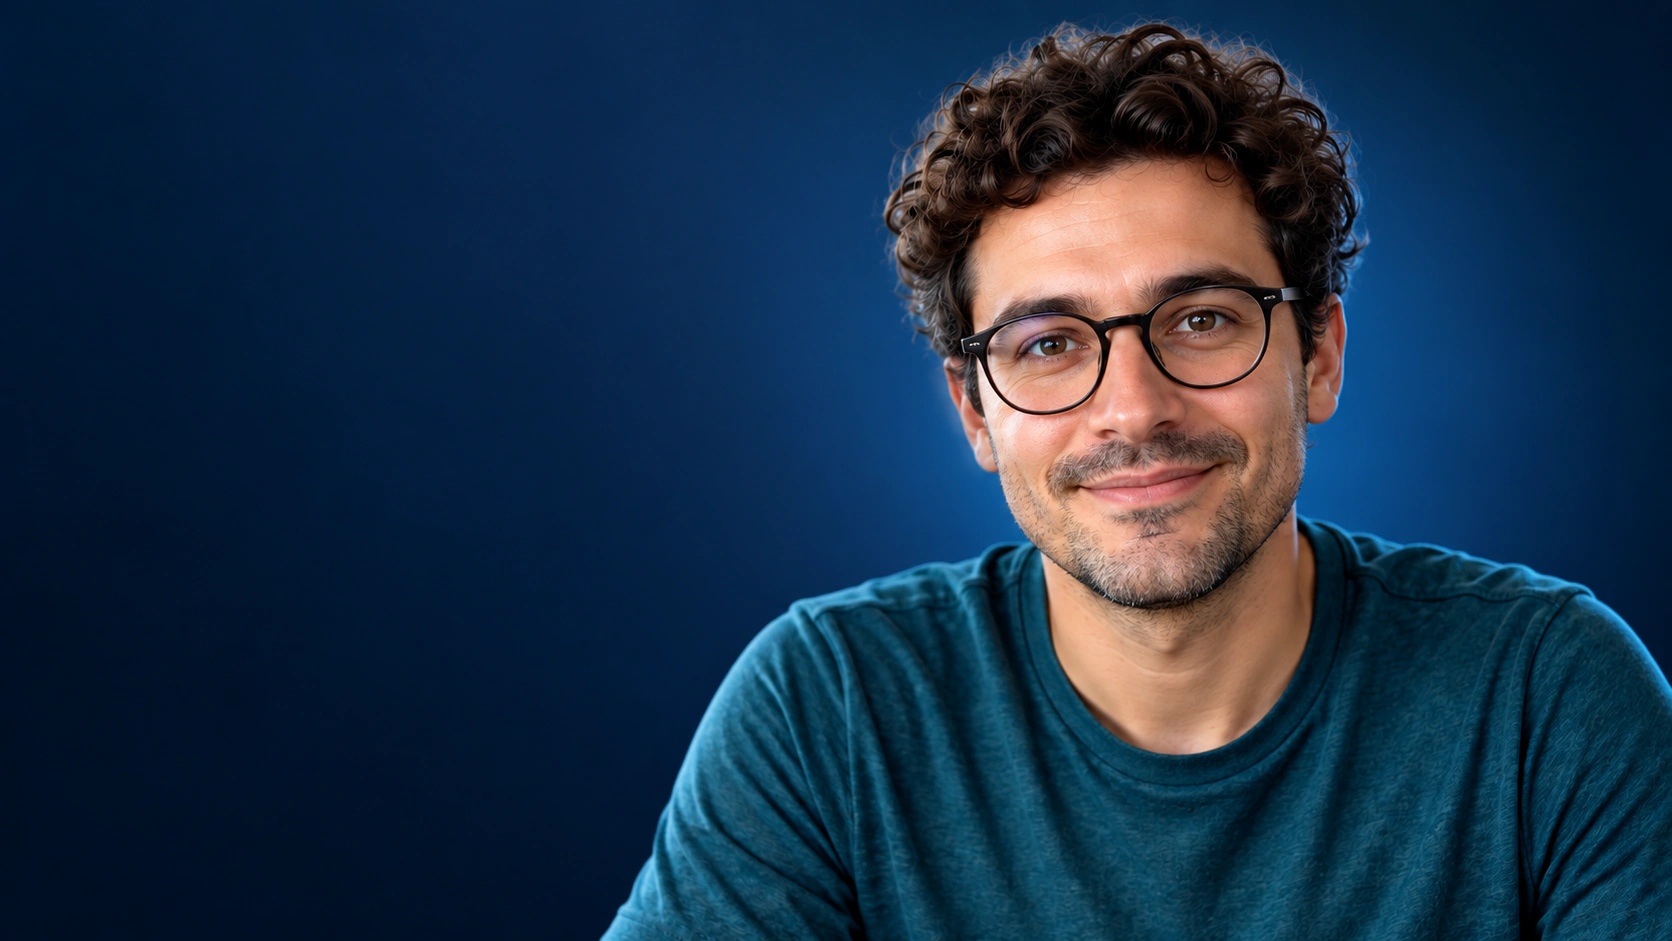
The presenter moves to the right against a dark blue background, with a clear face and no added text. Most of the left side is empty. The lower edge of the left shoulder begins at roughly 36% of the image width, slightly inside the requested 40% title zone.
Try a temporary title overlay during review. Check whether the face still reads at a small display size and whether bright background details compete with the title.
Limitations to check
The first output provides useful title space, but the shoulder crosses the proposed boundary at the bottom. Facial lighting and skin contrast also differ from the source. We have not validated a finished title overlay or click-through performance.
Follow-up prompt and observed outcome
text
Keep the subject identity and expression from the source photo. Move the
subject farther right so the left 40 percent is empty dark blue space.
Remove objects and bright highlights from that area. Do not add text
or change the face.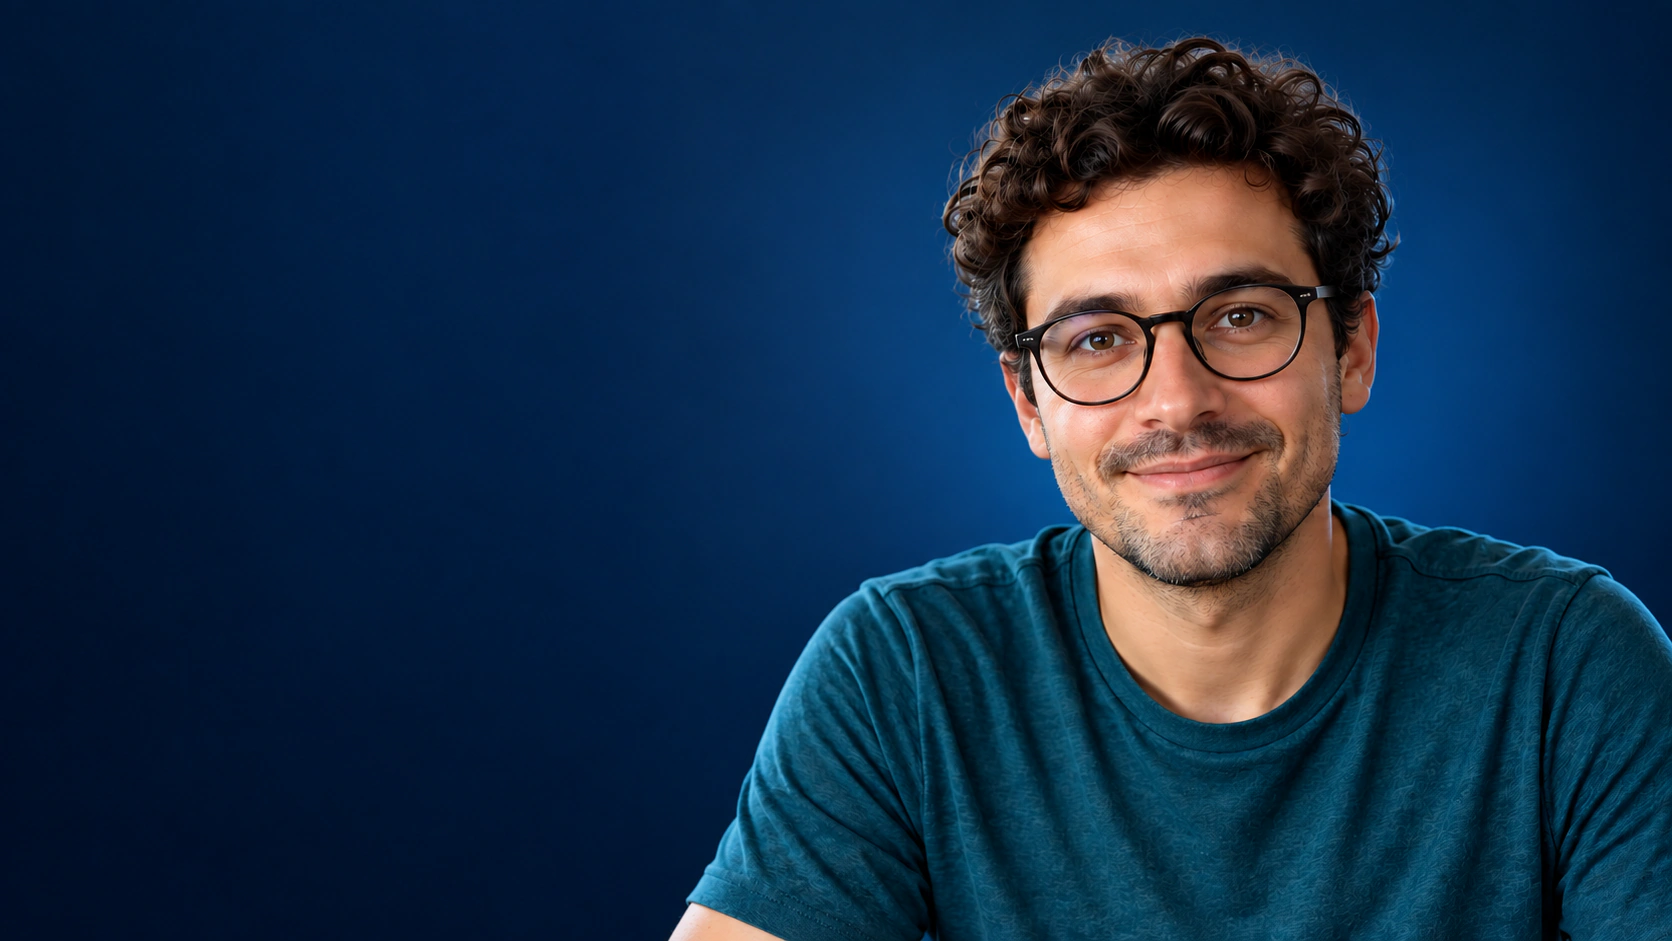
The second output shifts the presenter farther right: the shoulder now begins near the 40% boundary at the bottom. The left side is more usable for a title. The subject remains recognizable, but the crop and lighting are still different from the source.
Portrait edits that change only the outfit
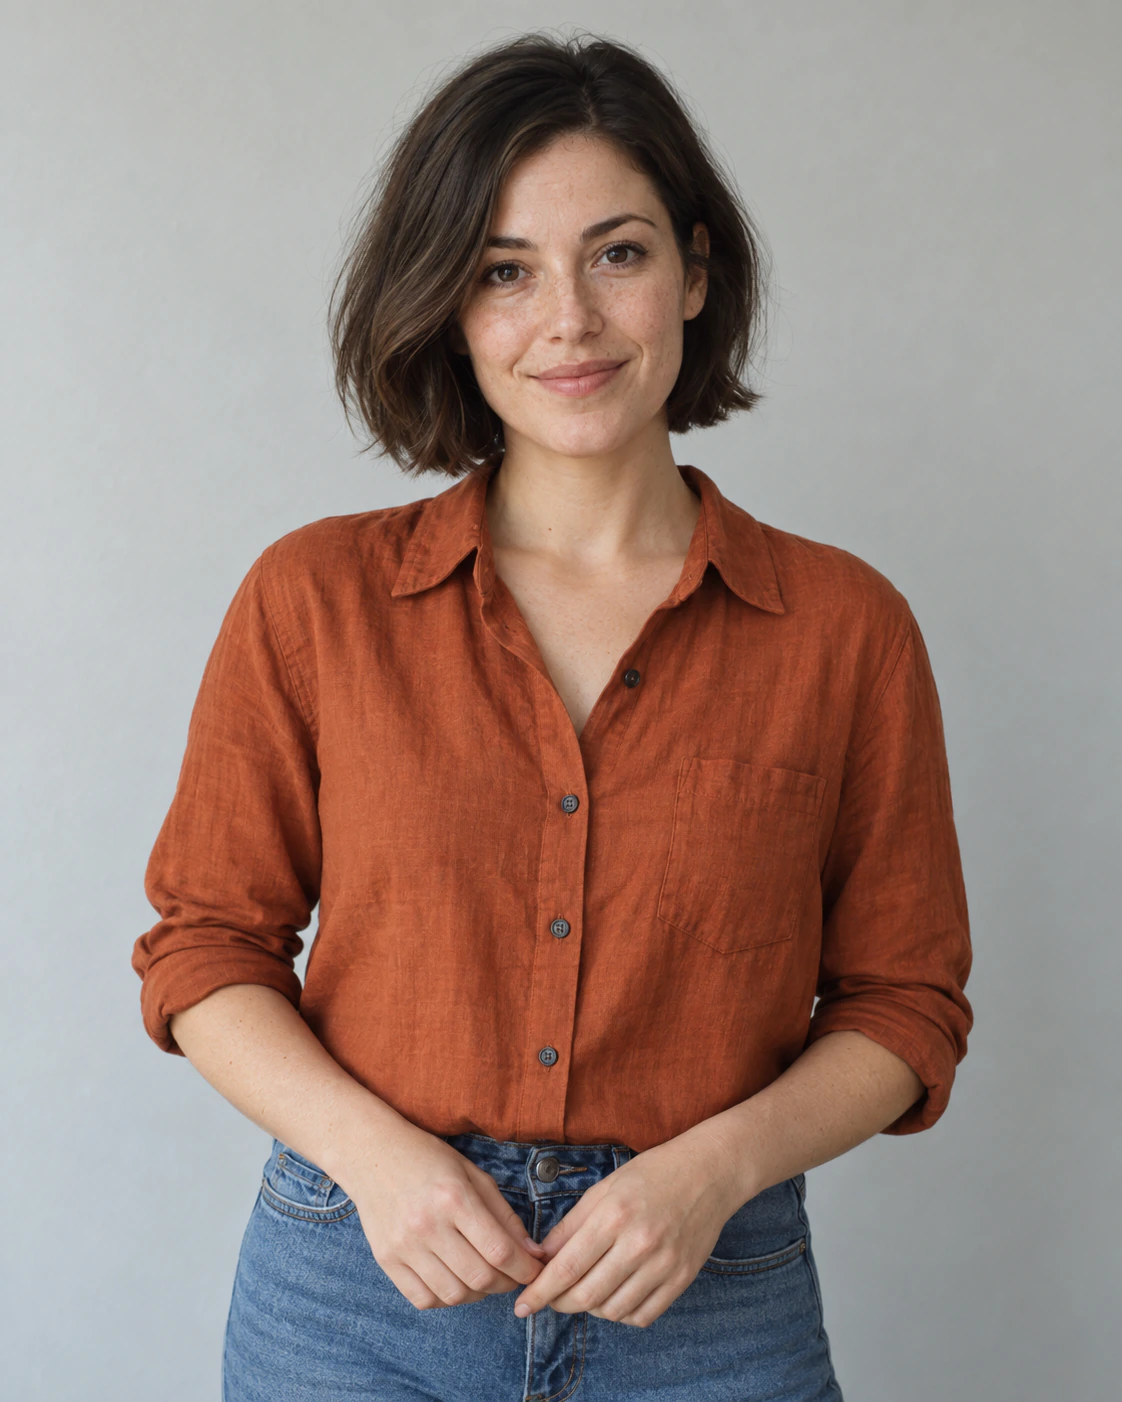
Use case: Replace visible clothing with a navy sweater while preserving the person's appearance and pose.
Keep the original portrait beside the result. A pleasing new portrait is not enough when the request is limited to clothing.
Full prompt
text
Edit the uploaded portrait. Replace only the visible clothing with a plain
navy crew-neck sweater. Preserve the same face, facial expression, skin
texture, hairstyle, head angle, body pose, hands, background, lighting,
and crop. Do not retouch the face or add accessories. Keep the original
image aspect ratio.
Actual result
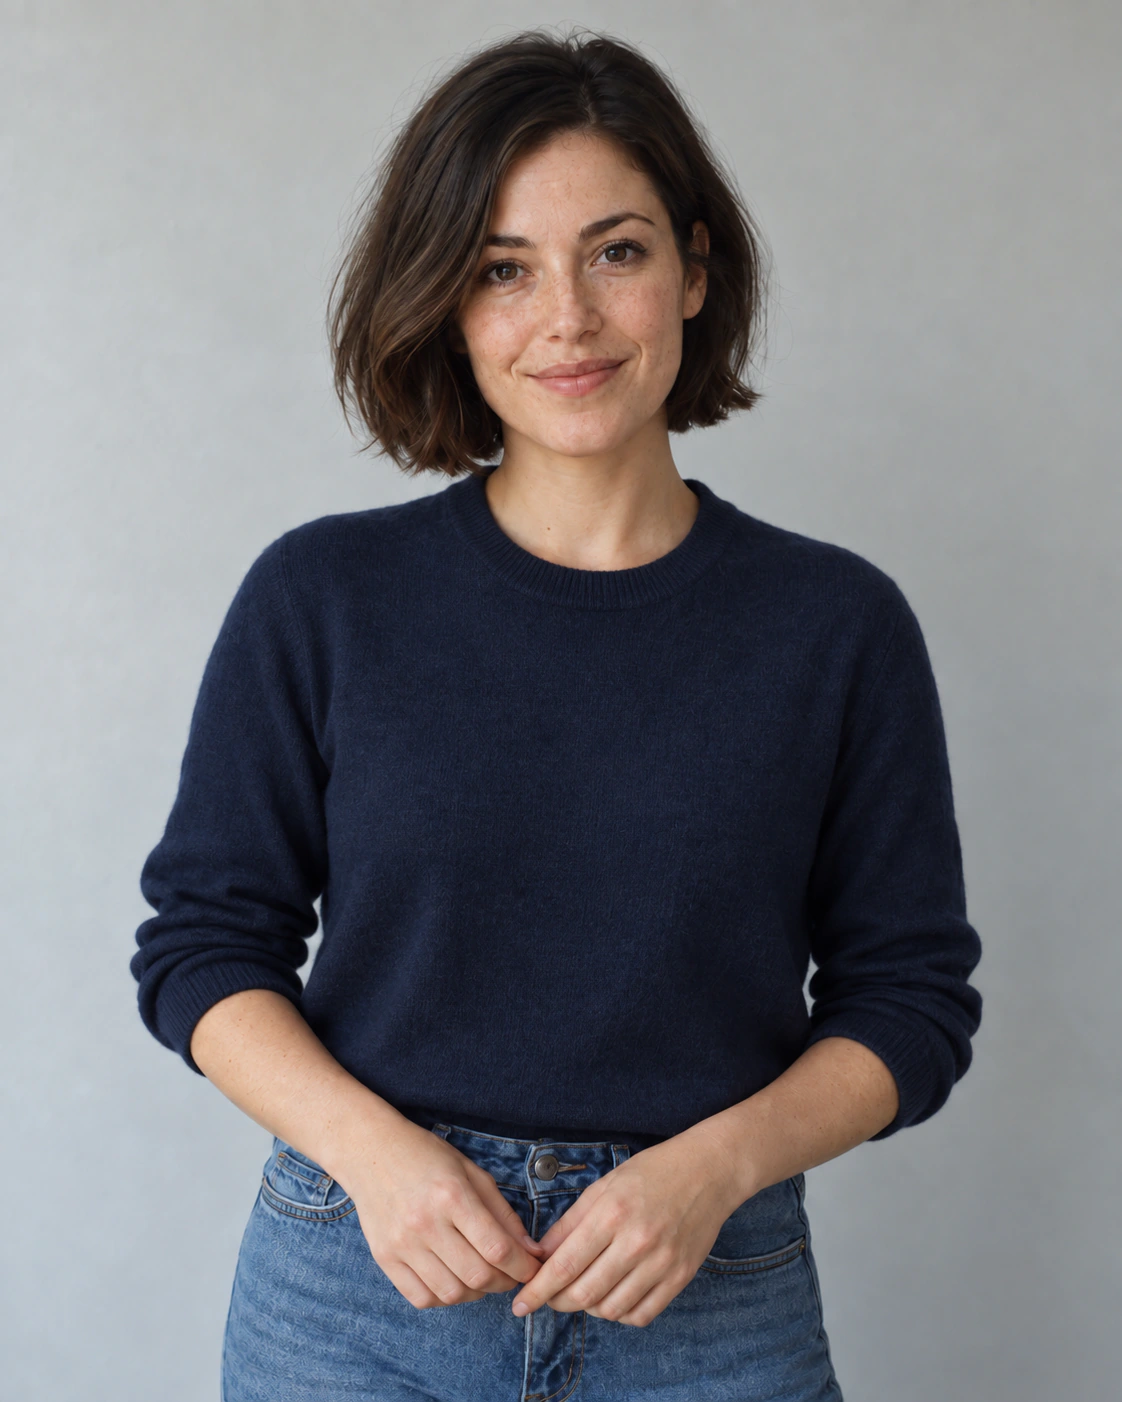
The rust-colored shirt becomes a navy crew-neck sweater. The bob haircut, expression, hand placement, and gray background remain visually close to the source. The new garment also covers more of the neck and waist, as expected from the changed cut.
Pay attention to the neckline and shoulders, where the new garment meets areas that should remain unchanged. Compare expression and head angle separately from clothing quality.
Limitations to check
This first output broadly satisfies the outfit request, but it is not an exact copy outside the shirt: skin and hair texture differ subtly. Also, “visible clothing” can include the jeans. If trousers must stay unchanged, name them explicitly in the prompt.
Follow-up prompt and observed outcome
text
Use the original portrait as the reference again. Apply the navy sweater
only within the original clothing region. Restore the original face,
hair, neck, hands, pose, and background. Keep every area outside the
clothing unchanged.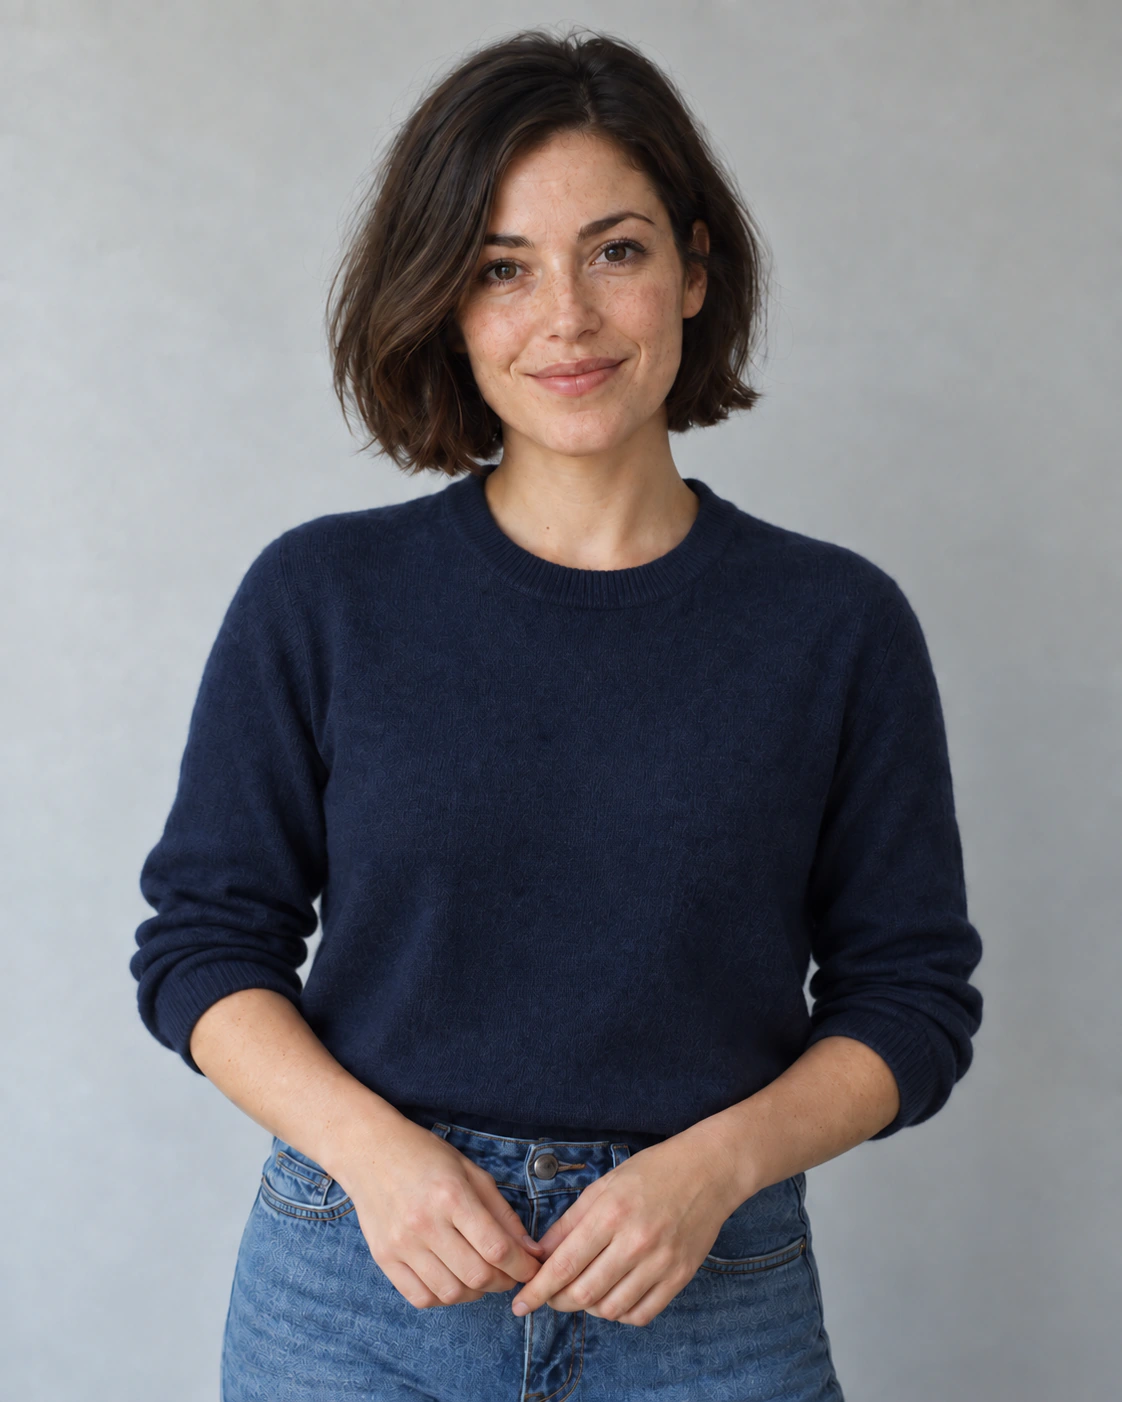
The second output retains the navy sweater and a similar pose, but introduces conspicuous decorative texture on the jeans and changes fine skin texture. We would keep the first edit. This follow-up shows that repeating preservation instructions does not guarantee preservation.
Character consistency across images
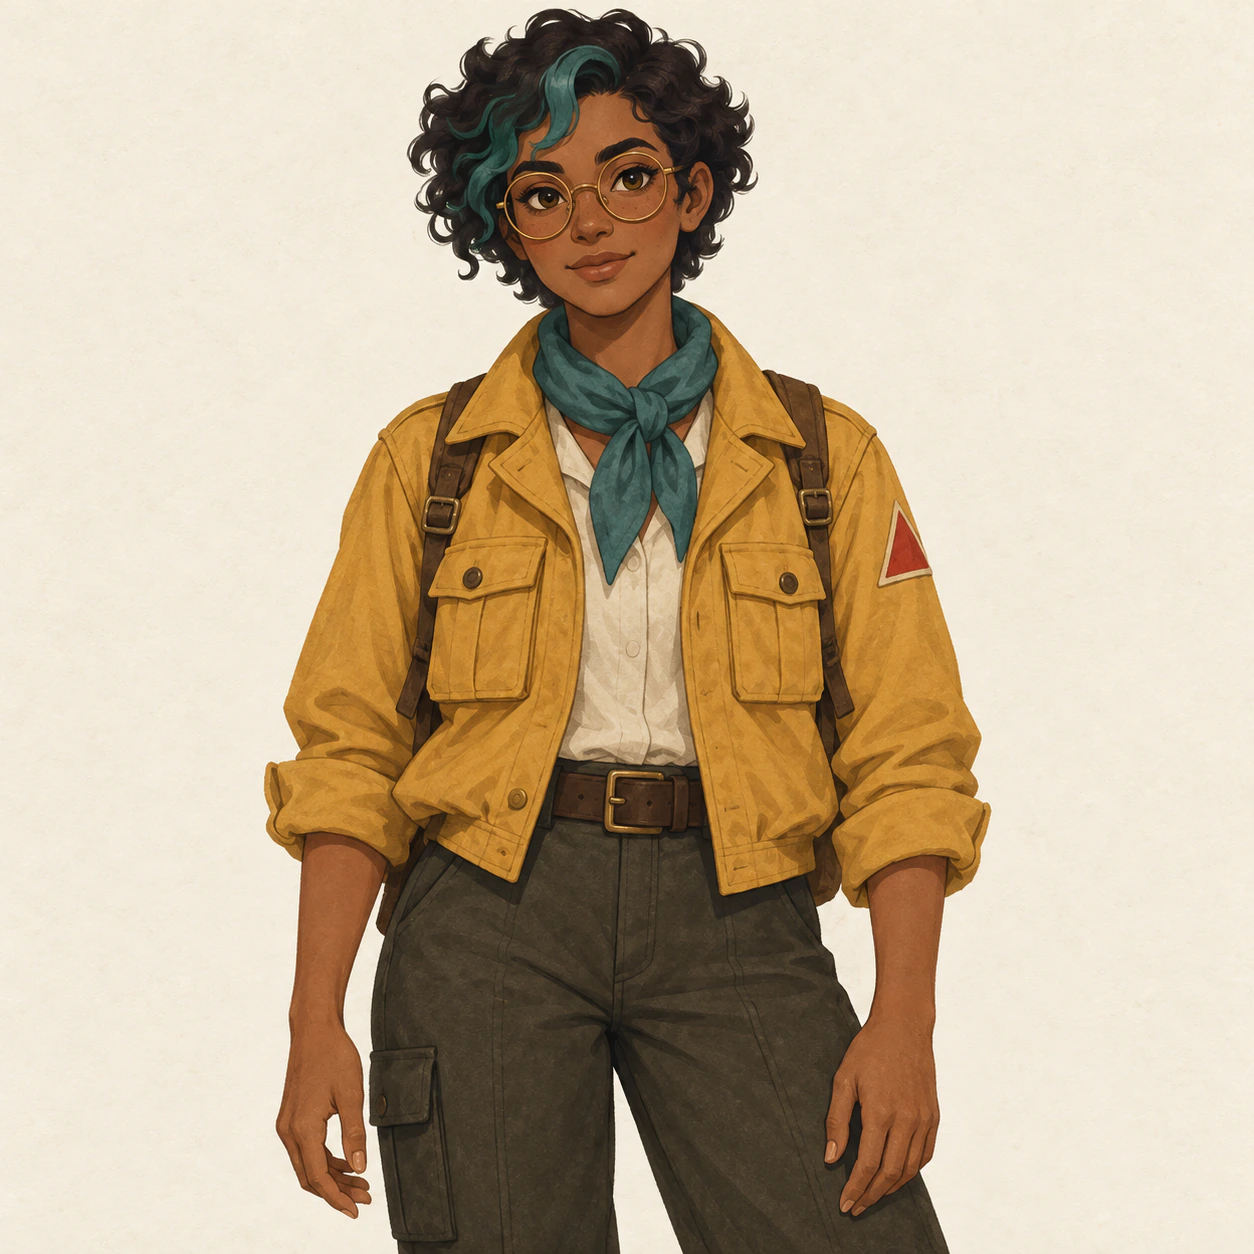
Use case: Show one reference character in a café, a city street, and a bookstore.
Use the same original reference for all three images. Evaluate the set together: one convincing image cannot demonstrate consistency across scenes.
Full prompt
text
Use the uploaded character reference. Create one image of this same
character in a [SCENE] setting. Preserve the reference facial features,
hairstyle, eye color, distinctive marks, outfit, and body proportions.
Show one character only in a medium shot. Keep a consistent illustration
style and color palette. Do not redesign the character or add text.
Run this prompt three times, replacing [SCENE] with cafe, city street, and bookstore. Upload the same reference each time and keep the other available settings consistent.
Actual results
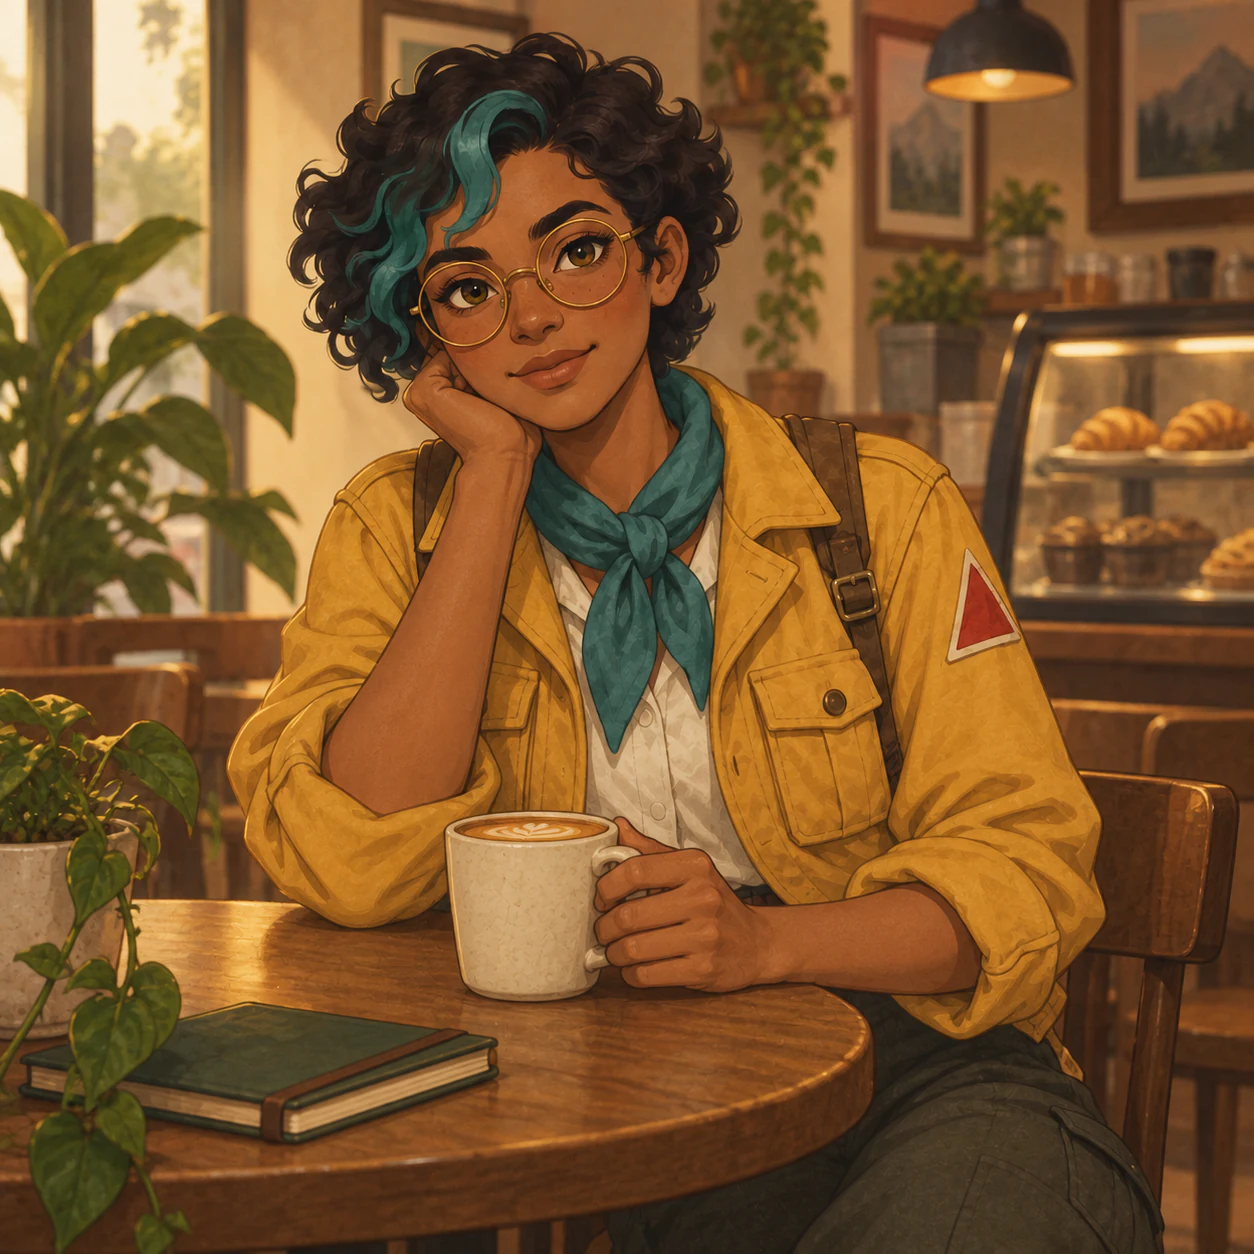
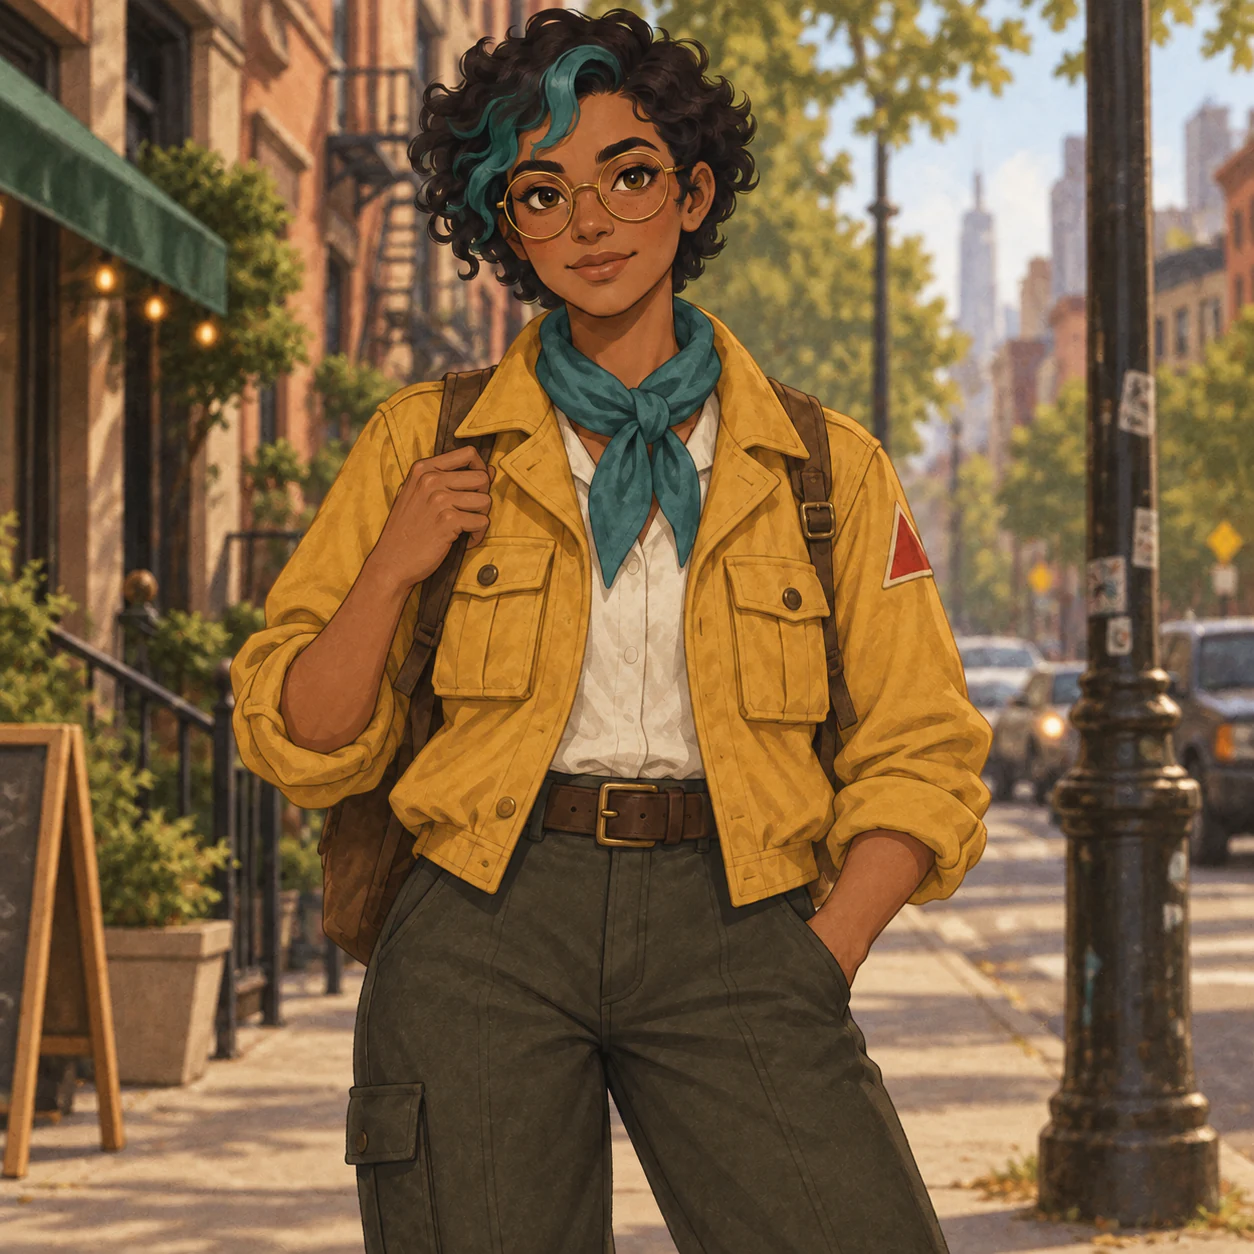
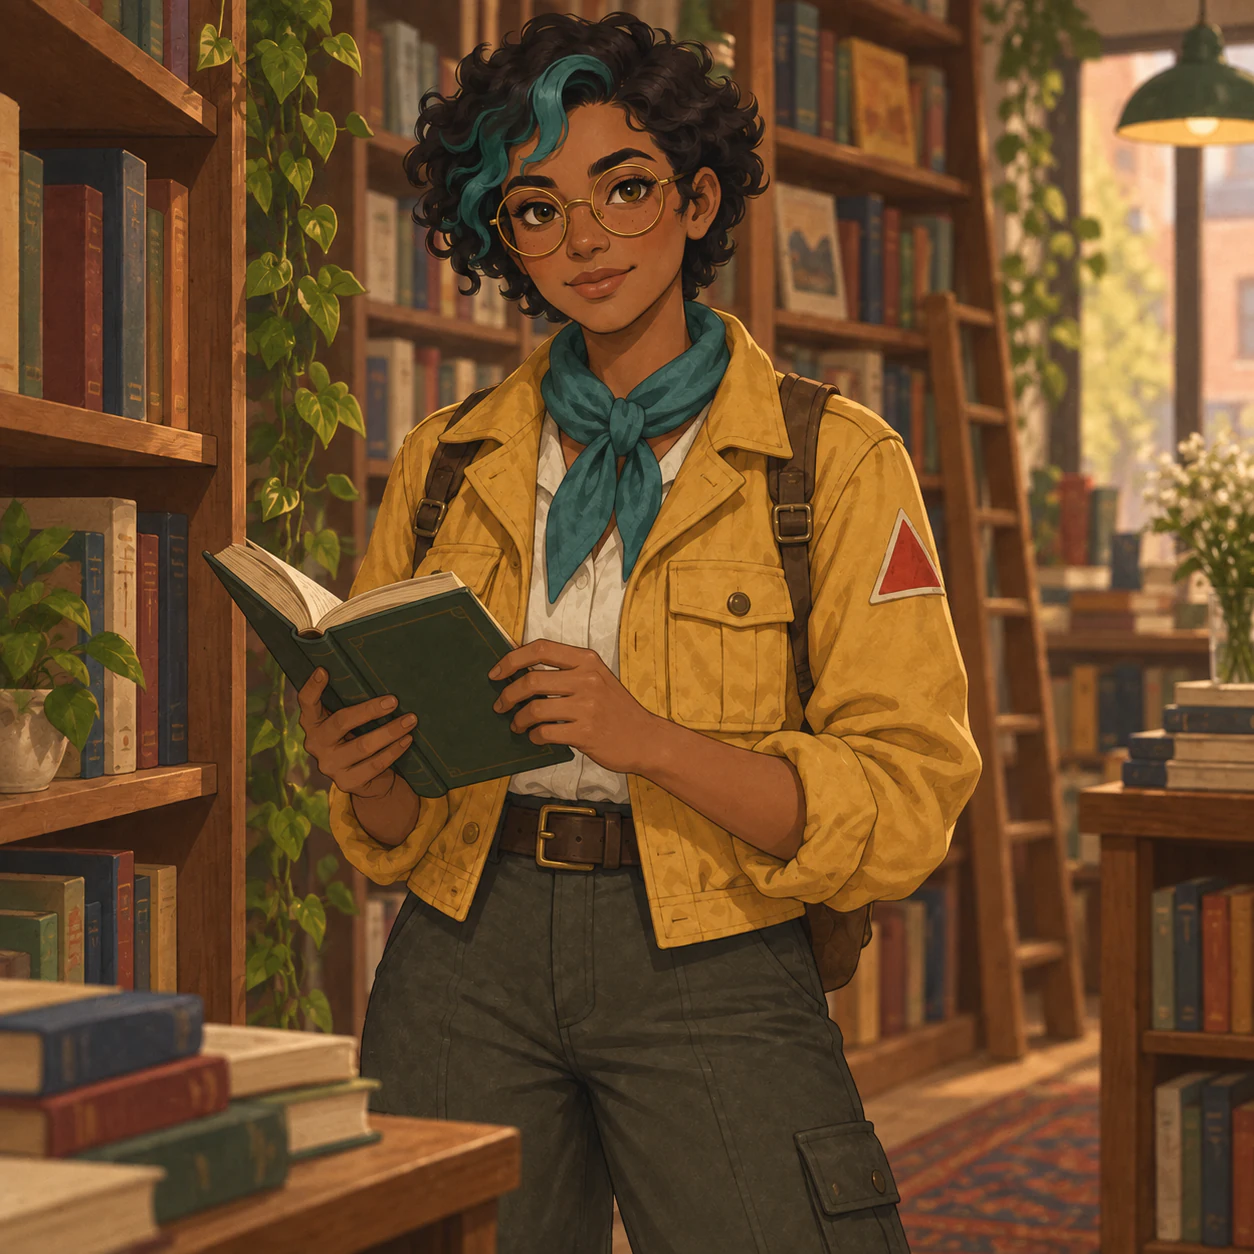
All three scenes retain the teal forelock, round amber glasses, mustard jacket, teal scarf, and red triangular sleeve patch. The café version sits with a mug, the street version holds a backpack strap, and the bookstore version holds an open book.
Compare facial shape, hairstyle, distinctive marks, clothing details, and body proportions. Record a separate verdict for each trait rather than reducing the set to a single “looks similar” judgment.
Limitations to check
The recognizable design carries across the set, but small costume details do not stay fixed. In the source and street output, a trouser cargo pocket is visible on the viewer’s left; in the bookstore output, the visible cargo pocket appears on the viewer’s right. Poses, folds, and framing also change.
Follow-up prompt and observed outcome
text
Regenerate the [SCENE] image using the original character reference as
the identity anchor. Match the reference facial geometry, hairstyle,
distinctive marks, outfit details, and body proportions. Change only the
setting and the pose needed for the scene. Preserve the same
illustration style. Preserve the original placement of the trouser cargo
pocket and the original jacket pocket shapes.
For the shown retry, [SCENE] was bookstore. Replace [SCENE] with the scene you need to retry. If a particular trait drifted, add a precise description of that trait based on the reference.
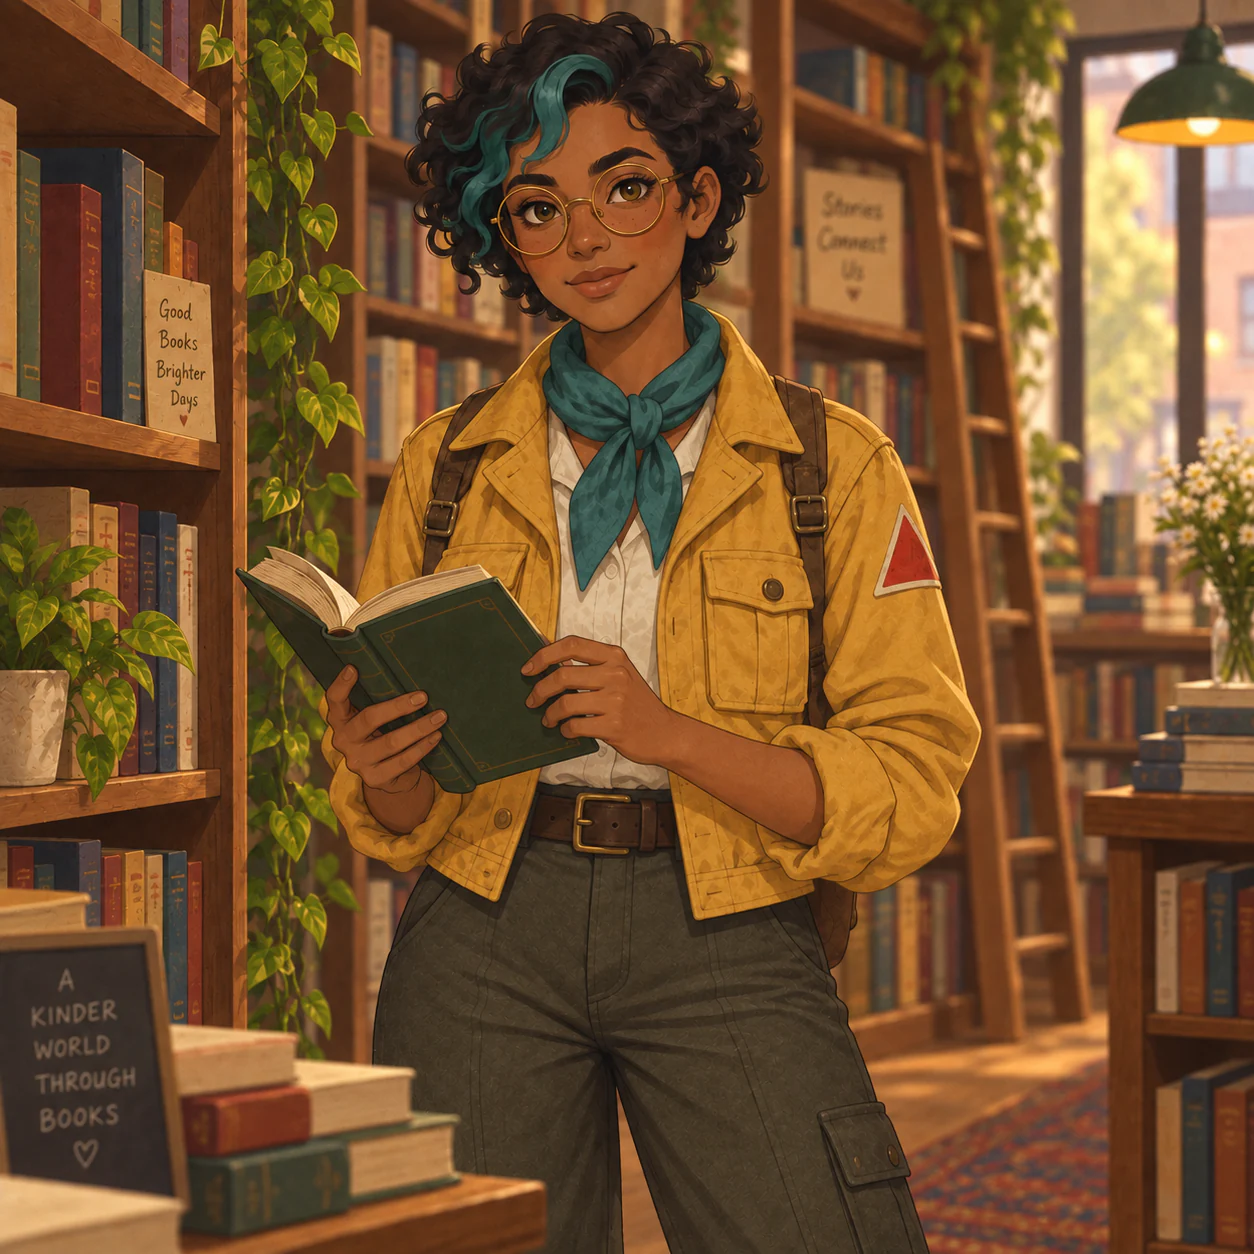
We retried the bookstore scene and explicitly requested the original pocket placement. The resulting image still shows the cargo pocket on the viewer’s right and introduces readable background signs, including “Good Books Brighter Days.” The follow-up did not establish exact costume consistency and added unwanted text.
Local edits and a second attempt
Use case: Change only a mug's color in a desk photo.
This is a narrow request with a clear boundary: the mug surface should change, while its shape and surroundings should remain recognizable as the original.
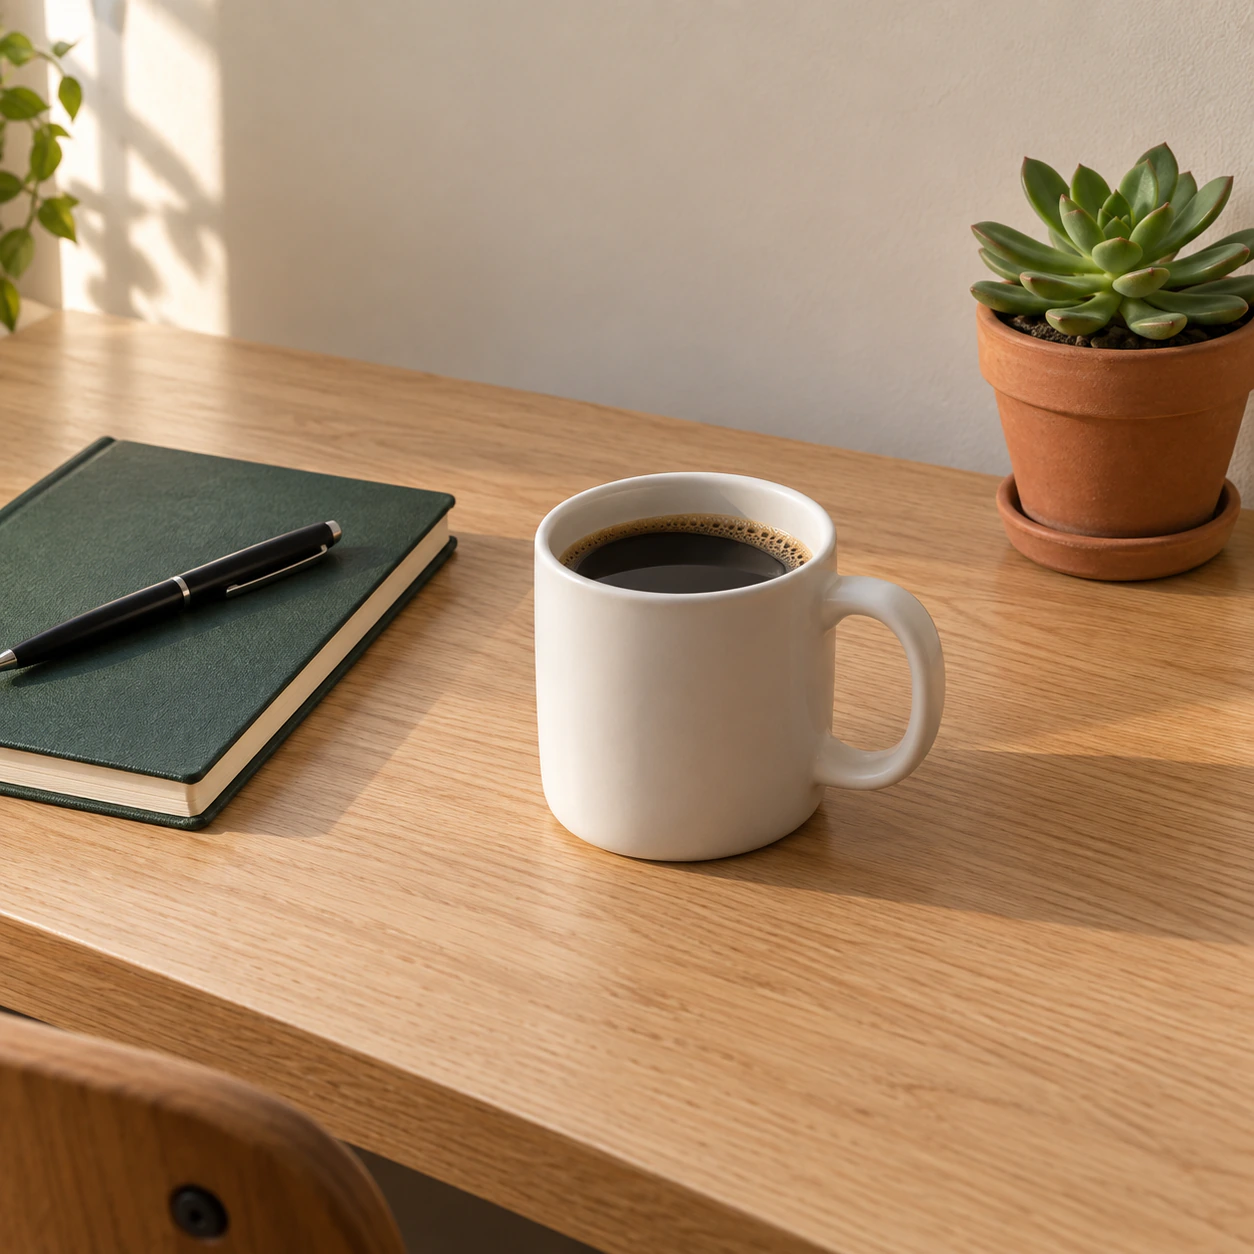
Full prompt
text
Edit the uploaded desk photo. Change only the ceramic mug color to matte
blue. Preserve the mug shape, handle, position, surface shading, and all
surrounding objects. Keep the desk, background, camera angle, and lighting
unchanged. Do not add or remove anything.
Actual result
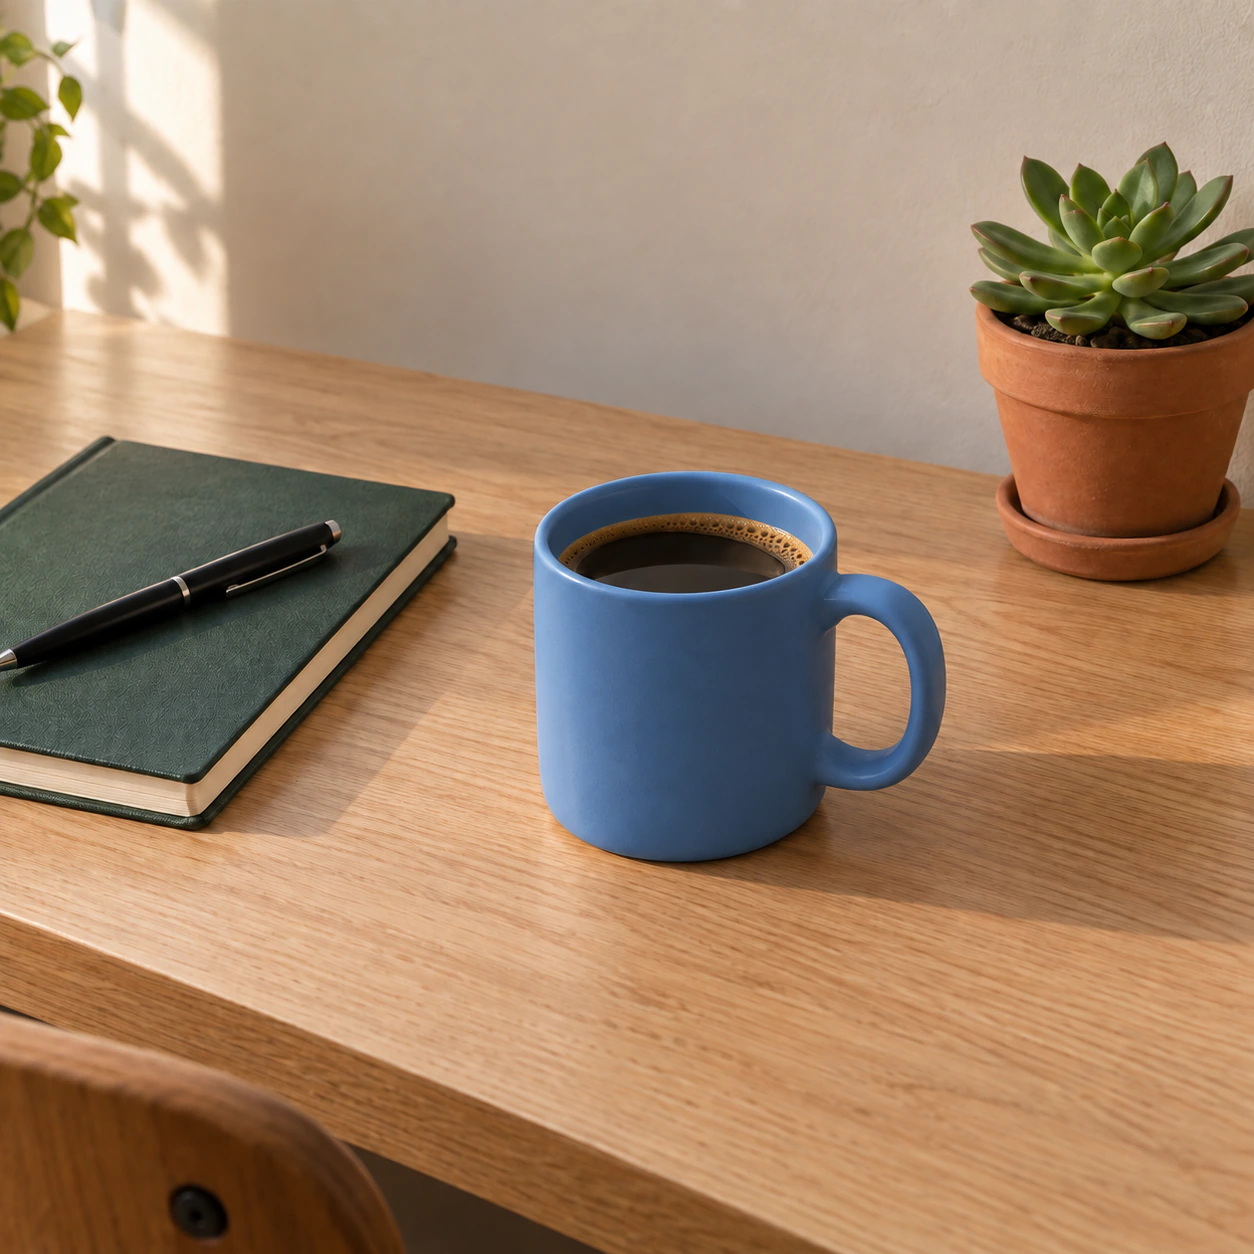
The mug changes from white to blue. The coffee, right-side handle, notebook, pen, and succulent remain in approximately the same positions. At the displayed scale, the first attempt broadly meets the requested local color change.
Limitations to check
No major displaced object is apparent in the first result. The mug rim and handle still show highlights, so the finish is not completely flat matte. We are showing a successful first attempt followed by a comparison run, not inventing an initial failure.
If the edit spreads beyond the mug or changes its shape, return to the original photo. Repeatedly editing an altered output can make it harder to tell which details still match the source.
Follow-up prompt and observed outcome
text
Return to the original desk photo. Limit the edit to the mug surface only.
Make its ceramic surface matte blue while retaining the original handle
shape, highlights, shadows, and position. Restore all surrounding pixels
and objects to match the original.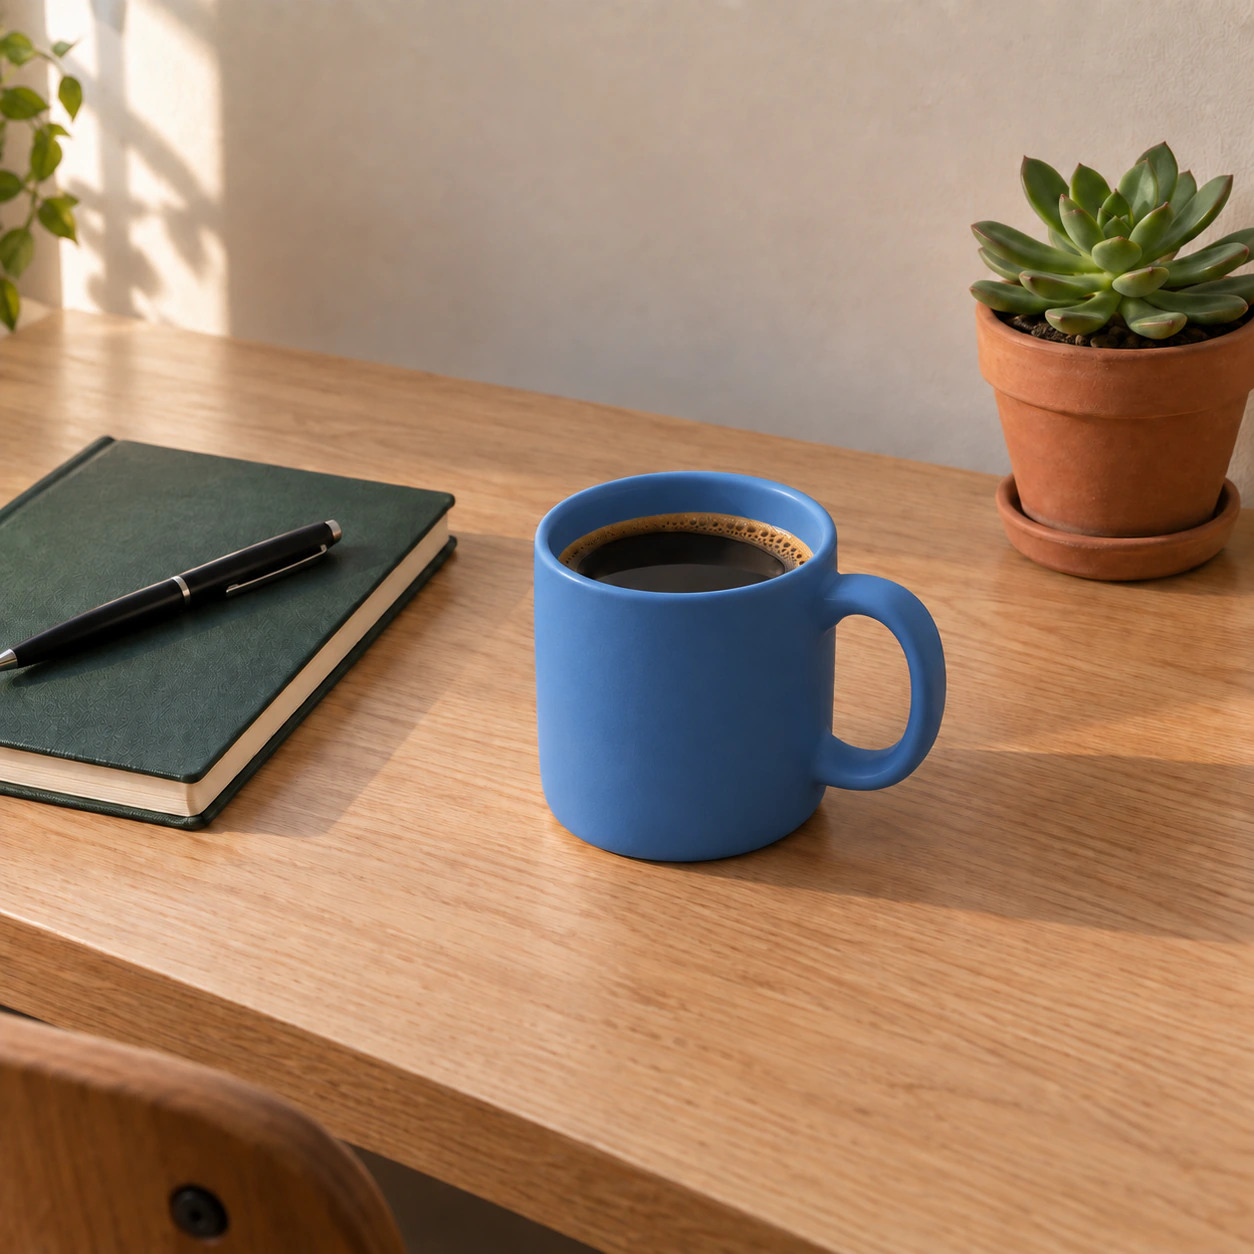
The second image keeps the mug blue and the broad desk arrangement, but subtle surface texture changes are visible on the notebook and tabletop. There is no clear practical gain over the first edit. “Restore all surrounding pixels” was an instruction, not a verified pixel-level outcome.
Frequently asked questions
How do I adapt these GPT Image 2.5 prompts to my own images?
Replace the subject, requested change, and composition details. Keep the preservation instructions that matter to your task. For example, a product edit needs accurate packaging and text, while an outfit edit needs the same face and pose.
Will a product label stay exactly the same?
Do not assume so from the prompt alone. Compare the output with the original at full resolution, checking the logo and every readable line. Treat a changed label as a failed requirement even if the rest of the image looks good.
How should I request exact text on a poster?
Provide each required line explicitly, specify the hierarchy, and ask for no additional words. Review the actual lettering afterward. If repeated attempts leave errors, add the final typography in a design editor and disclose that step in the example.
How do I change an outfit without changing the face?
Ask for a clothing-only edit and list the features that must stay unchanged. Keep the original portrait available as a reference. Check the face, neckline, hair, and pose after each attempt; a follow-up instruction still requires inspection.
How do I check character consistency?
Compare all outputs against the same original reference. Use a fixed list of traits, including facial shape, hairstyle, marks, outfit, and proportions. Describe which scene differs and how, even when other images in the set work well.
What should I do when a local edit changes too much?
Return to the original image and narrow the instruction to the intended region. Name the details that changed unexpectedly. If the tool supports a selection or mask, use it to define the area, then check the surrounding image again.
Does writing “WebP” in the prompt make the download a WebP file?
The download format depends on the tool's export controls. If it does not export WebP, convert the downloaded image before publishing. Changing a filename extension alone does not convert the file. Check the exported image for legible text and preserved detail.
Ready to try your next idea in ChatGPT?
Pick a sketch, product photo, or portrait from your own project and adapt one of the prompts above. If you are looking to purchase ChatGPT Plus account access, explore FamilyPro’s GPT Plus product page to compare the available packages and durations and choose an option that fits your needs.
FamilyPro describes this offering as shared account access for the official ChatGPT website, with account credentials available through your order page. Review the selected package’s service rules before purchasing: API access is not included, and you should confirm current image-model availability and usage limits if you specifically need GPT Image 2.5.